AZ - 700 - 02 - Design and implement hybrid networking
A
I’m Amir Rouhanipoor, an IT Consultant specializing in Azure and cloud solutions. I help organizations streamline their IT and drive growth through secure, efficient cloud technologies.
Search for a command to run...
I’m Amir Rouhanipoor, an IT Consultant specializing in Azure and cloud solutions. I help organizations streamline their IT and drive growth through secure, efficient cloud technologies.
No comments yet. Be the first to comment.
PowerShell Script for VM Size Comparison This script lists all session hosts with their host pool, VM name, and VM size across all host pools(loop through multiple resource groups): Connect-AzAccount # Get all host pools $hostPools = Get-AzWvdHostPo...
M03 - Unit 4: Configure an ExpressRoute Gateway Exercise Scenario To connect your Azure virtual network to your on-premises network using ExpressRoute, you must first create a virtual network gateway. A virtual network gateway serves two key purposes...
M02-Unit 3 Create and configure a virtual network gateway Scenario You will configure a VPN gateway to securely connect CoreServicesVnet (East US) and ManufacturingVnet (North Europe) using VNet-to-VNet VPN. Task 1: Create CoreServicesVnet and Manuf...
Introduction Azure ExpressRoute is a private, enterprise-grade connection that enables secure and reliable network connectivity between your on-premises infrastructure and Microsoft’s global network. It bypasses the public internet and provides high ...
You need to create three virtual networks: 1. CoreServicesVnet Region: East US Purpose: Main network (web services, databases, shared services like DC/DNS). Connectivity: Needs VPN connection to on-premises. Address Space: Large (because of expe...
Security-focused Cloud & Automation Engineer with a Master’s in Computer Science and 6+ years of experience automating and supporting enterprise IT environments across multi-site corporate and operational infrastructures. Proficient in Python scripting, Azure infrastructure, Windows Server, and identity management. Skilled in integrating third-party platforms, securing configurations, and streamlining operations. Currently pursuing the Cybersecurity Architect Expert certification with a strong focus on cloud security and automation.
To build a secure and scalable hybrid network, start with VPNs. Site-to-Site VPNs, Point-to-Site VPNs, Azure Virtual WAN to connect and manage multiple sites or regions or Network Virtual Appliances (NVAs) for added security and routing control.
Azure VPN Gateway enables secure connections between your Azure environment and other locations. Before deploying a connection, you need a defined endpoint for the data—this is where the VPN Gateway setup begins.
We’ll briefly cover:
Types of connections you can establish using the VPN Gateway
Configuration options available for setup and deployment
Gateway generations and SKUs to help you choose the best fit for your needs

Site-to-Site (S2S) VPN
Connects an on-premises location to Azure. It can also link two Azure environments, though virtual network peering is more common now.
Point-to-Site (P2S) VPN
Allows individual devices—like laptops or phones—to securely connect to your Azure network using a VPN client or native Windows support.Perfect for remote work and on-the-go access.
Setup Requirements
Regardless of the connection type, you’ll need:
A VPN Gateway in your Azure virtual network
A public IP address for access
Proper routing to allow traffic into your virtual network
Before deploying a VPN Gateway in Azure, planning is critical. Start by creating a dedicated gateway subnet in your virtual network. You’ll need a /27 or /28 CIDR block, depending on your scaling needs. Only Azure-managed gateways (VPN and ExpressRoute) should use this subnet.
When you create your gateway subnet, gateway VMs are deployed to the gateway subnet and configured with the required VPN gateway settings.
Important:
One gateway per virtual network
Never deploy non-gateway resources to the gateway subnet (e.g. no additional VMs)
Azure handles backend scaling automatically, ensuring your selected SKU meets bandwidth demands.

To deploy a VPN gateway:
Specify name, region, VPN type (Route-based or Policy-based), SKU, and generation
Route-based (preferred) supports IKEv2 (آیک) and dynamic routing
Policy-based supports only IKEv1 and is considered legacy
Your choice of gateway SKU affects the number of connections and the aggregate throughput benchmark.
Associate a virtual network that includes the gateway subnet.
The gateway needs a public IP address.
Provisioning takes about 45 minutes, so plan accordingly.
Gateway SKU and Generation Comparison:

Gen1: 650 Mbps–1.25 Gbps
Gen2: Starts at 1.25 Gbps and scales higher
You can resize within the same generation
The Basic SKU (not shown) is legacy and should not be used.
A Site-to-Site (S2S) VPN allows you to establish a secure connection over the public internet between Azure and another location—whether that’s an on-premises data center, a private network, or even another cloud provider. This setup ensures that data remains protected while traversing public infrastructure.
To set this up, there are several steps involved, each addressing a piece of the connection:
Typical Setup:
On the Azure side, you’ll have a Virtual Network (VNet) with subnets and a VPN Gateway already provisioned.
On the on-premises side, your network (with resources like VMs) includes a VPN-capable edge device.

The connection is made by creating and linking resources like the local network gateway, VPN gateway, and VPN connection object in Azure.
Steps:

Configure the VPN device on-prem – Use Microsoft’s prebuilt scripts for popular devices (Cisco, Ubiquiti, etc.). Generate and apply a shared key – Used for secure authentication.
Create a VPN connection – Link the Azure VPN Gateway with the local network gateway using the shared key.
Create the connection object after your VPN gateway is deployed and the on-prem device is configured.
Name the connection and set the type to Site-to-site (IPSec).
Select both the Azure VPN Gateway and the Local Network Gateway.
Enter the pre-shared key used by the on-premises VPN device.

always validate using Network Watcher, logs, and health probes to confirm connectivity and performance.
Validate VPN throughput to the VNet
Utilize Network Watcher for diagnostics
Use diagnostic logs to troubleshoot the Azure VPN Gateway
Check UDR and NSGs on the gateway subnet
Verify the on-premises VPN device is validated
Verify shared key and VPN peer IPs
Use Azure gateway health probe for status
Check if the on-prem VPN device supports perfect forward secrecy
So in summary:
Create a virtual network with a GatewaySubnet.
Provision a Virtual Network Gateway in that VNet.
Create a Local Network Gateway with on-prem IP and address space.
Configure the on-prem VPN device with matching settings.
Create the Site-to-Site VPN connection using a shared key.

Point-to-site (P2S) VPNs allow user devices (laptops, phones) to connect to Azure securely.
Requirements:
Azure VPN Gateway already provisioned
Proper IP address pool for connected users
Compatible VPN clients (OpenVPN, SSTP, IKEv2)
Authentication Options:
Azure Entra ID (formerly Azure AD)
On-prem Active Directory via RADIUS server
Choose based on identity store and protocol type
Configure in the Azure portal under Point-to-site configuration. Plan IP pool size based on expected simultaneous users.

To keep things smooth, no matter the authentication method or connection type, you need to go through the initial setup to ensure Point-to-Site works.
Head to your Virtual Network Gateway, scroll down, and click Point-to-site configuration. Here, configure key settings—especially the address pool for Point-to-Site connections. You’ll need a subnet with enough private IPs for each user connecting. Think about how many simultaneous users you’ll support—10, 100, 1,000, or more. Make sure there’s enough IP space to allow everyone to connect.
If you’re deploying resilient options like an active-active gateway, you’ll need additional IPs to support failover. Plan carefully—your address range and number of IPs per user will affect your setup. Once that’s done and authentication is configured, users can securely connect from anywhere.
In Address pool, enter the private IP range you want to assign to VPN clients. VPN clients will get IPs dynamically from this range. Use a /29 subnet for active/passive, /28 for active/active setups.

To ensure high availability:
1. Deploy virtual gateway in Availability Zones format(if region supports it):
e.g. We have two gateway instances, deployed in separate availability zones. These zones are physically isolated—with different power, cooling, and data centers—to ensure high uptime. All traffic can go to one location, but in case of a failure or config issue, it will automatically fail over to the other instance.
This setup ensures high availability and is one of the simplest ways to boost uptime.

By default, gateways are in active-standby mode—only one connection is needed, and in case of failure, traffic shifts to the standby gateway. It’s easy to set up and works well for most cases.
2. Active-Active Configuration:
Improves uptime by allowing multiple active paths. Requires extra on-prem setup and dual connections.
However, if cutover downtime isn’t acceptable, or you need higher uptime, choose the active-active deployment. This setup requires:
Multiple connections on your side
Following Azure’s high availability architecture guidance
Planning for different network topologies
With active-active, your VPN connection remains up even if one side or gateway goes down. You’ll have four possible paths, so if one fails, others stay available.
Azure Virtual WAN (vWAN) simplifies enterprise connectivity across regions, sites, and connection types.
Benefits:
Centralized routing and policy management
Supports Site-to-Site, Point-to-Site, and ExpressRoute
Inter-region connectivity via linked hubs

Basic Virtual WAN / Hub
Standard Virtual WAN / Hub
Supports:
ExpressRoute
User VPN (Point-to-site)
VPN (Site-to-site)
Inter-hub and VNet-to-VNet transiting through the virtual hub
Minimum address space required to create a hub is /24.
You don’t need to manually plan subnets for services in the virtual hub.(more flexible than vnet)
Azure Virtual WAN is a managed service—it automatically creates the necessary subnets for each gateway or service.
This includes services like:
VPN gateways
ExpressRoute gateways
User VPN (Point-to-site) gateways
Firewall, routing, etc.
Deployment Steps:
Choose region, SKU (Basic or Standard), and private address space
Standard SKU supports multi-region and all connection types
Configure route tables for traffic flow between regions and branches
Cross-tenant routing: Azure Virtual WAN allows you to connect virtual networks from other Azure tenants into a shared Virtual WAN hub, enabling secure and centralized cross-tenant networking.
Whether you’re in a single-tenant or multi-tenant setup, it all comes down to one thing: routing—just like everything else in virtual networking.

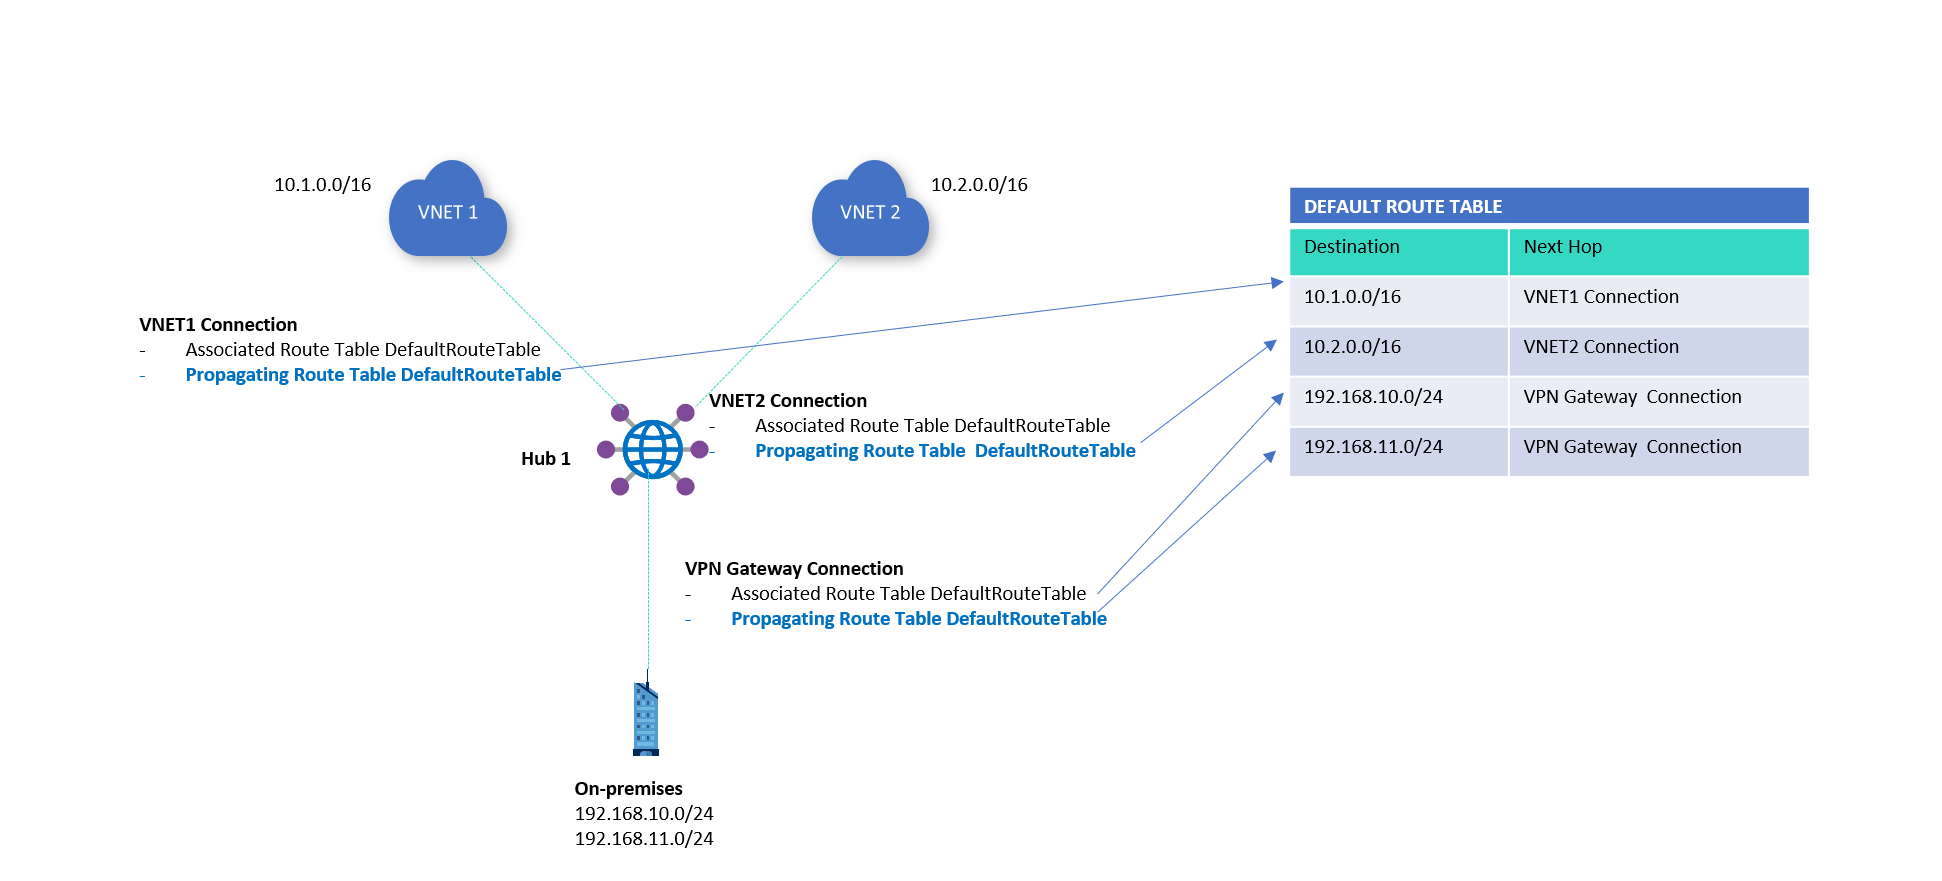
Just like in virtual networks, Azure Virtual WAN uses route tables to control traffic flow and define the next hop. In vWAN, you propagate a route table at the hub, which then gets automatically associated and pushed out to connected resources—so everything around the hub knows what’s inside it.
The central hub can handle up to 50 Gbps of aggregate throughput, making it ideal for connecting multiple sites with high traffic demands.
By setting up route connections and defining paths in your routing tables, you control where traffic flows. Configuration is straightforward through the default route table, and for more advanced setups, click on the image below:
NVAs are third-party appliances like firewalls or SD-WAN tools deployed in Virtual WAN hubs. (Click on the image below for more info)
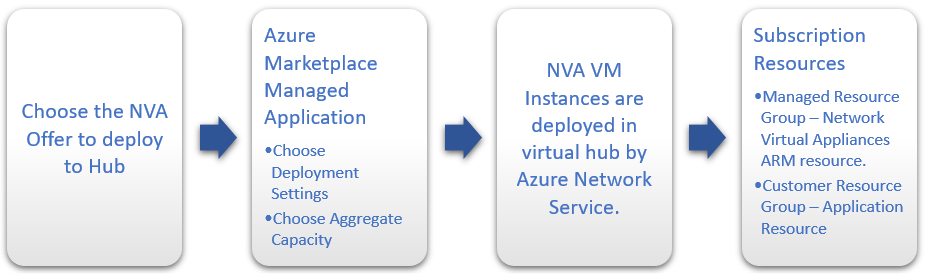
Steps:
Choose from Azure Marketplace – Vendors like Fortinet and VMware offer pre-configured solutions.
Provision into Virtual WAN hub
Scale correctly – Select the appropriate scale unit for required bandwidth
Use vendor-provided tokens for secure setup (Sometimes, the vendor requires you to provide an authentication token to verify that you’re a registered user. This must be obtained directly from the vendor.)
These are fully managed deployments, not manual VMs, and scale with your network needs.