AZ - 700 Lab 1
I’m Amir Rouhanipoor, an IT Consultant specializing in Azure and cloud solutions. I help organizations streamline their IT and drive growth through secure, efficient cloud technologies.
Security-focused Cloud & Automation Engineer with a Master’s in Computer Science and 6+ years of experience automating and supporting enterprise IT environments across multi-site corporate and operational infrastructures. Proficient in Python scripting, Azure infrastructure, Windows Server, and identity management. Skilled in integrating third-party platforms, securing configurations, and streamlining operations. Currently pursuing the Cybersecurity Architect Expert certification with a strong focus on cloud security and automation.
You need to create three virtual networks:
1. CoreServicesVnet
Region: East US
Purpose: Main network (web services, databases, shared services like DC/DNS).
Connectivity: Needs VPN connection to on-premises.
Address Space: Large (because of expected growth).
Address Space: 10.20.0.0/16
Subnets:
GatewaySubnet → 10.20.0.0/27
SharedServicesSubnet → 10.20.10.0/24
DatabaseSubnet → 10.20.20.0/24
PublicWebServiceSubnet → 10.20.30.0/24
2. ManufacturingVnet
Region: West Europe
Purpose: Manufacturing operations, lots of connected devices (IoT).
Connectivity: No mention of VPN, but must support many devices.
Address Space: Medium to Large, scalable.
Address Space: 10.30.0.0/16
Subnets:
ManufacturingSystemSubnet → 10.30.10.0/24
SensorSubnet1 → 10.30.20.0/24
SensorSubnet2 → 10.30.21.0/24
SensorSubnet3 → 10.30.22.0/24
3. ResearchVnet
Region: Southeast Asia
Purpose: Research & Development (small, stable).
Connectivity: No VPN mentioned.
Address Space: Small
Address Space: 10.40.0.0/16
Subnet:
- ResearchSystemSubnet → 10.40.0.0/24

Click on the image above for more info
You will create the following resources:
| Virtual Network | Region | Address Space | Subnets |
| CoreServicesVnet | East US | 10.20.0.0/16 | GatewaySubnet (10.20.0.0/27), SharedServicesSubnet (10.20.10.0/24), DatabaseSubnet (10.20.20.0/24), PublicWebServiceSubnet (10.20.30.0/24) |
| ManufacturingVnet | West Europe | 10.30.0.0/16 | ManufacturingSystemSubnet (10.30.10.0/24), SensorSubnet1 (10.30.20.0/24), SensorSubnet2 (10.30.21.0/24), SensorSubnet3 (10.30.22.0/24) |
| ResearchVnet | Southeast Asia | 10.40.0.0/16 | ResearchSystemSubnet (10.40.0.0/24) |
These virtual networks and subnets are designed to support current resources and future growth.
In this exercise, you will:
Task 1: Create the Contoso resource group.
Task 2: Create CoreServicesVnet and its subnets.
Task 3: Create ManufacturingVnet and its subnets.
Task 4: Create ResearchVnet and its subnet.
Task 5: Verify the VNets and Subnets are created.
Lab Instructions: Create Resource Group, Virtual Networks, and Subnets
Task 1: Create the Contoso Resource Group
Go to the Azure portal.
On the home page, under Azure services, select Resource groups.
Select + Create.
Configure as follows:
Resource group: ContosoResourceGroup
Region: (US) East US
Tags: No changes needed
Click Review + create, then Create.
Verify that ContosoResourceGroup appears in the Resource Groups list.
Task 2: Create the CoreServicesVnet Virtual Network and Subnets
From the Azure portal, search for Virtual Networks in the Global Search bar and select it.
Select + Create.
Configure as follows:
Resource Group: ContosoResourceGroup
Name: CoreServicesVnet
Region: (US) East US
IPv4 address space: 10.20.0.0/16
(Remove or overwrite the default address space)

Add subnets:
GatewaySubnet
Subnet purpose: Virtual Network Gateway
Subnet address range: 10.20.0.0/27
SharedServicesSubnet
- Subnet address range: 10.20.10.0/24
DatabaseSubnet
- Subnet address range: 10.20.20.0/24
PublicWebServiceSubnet
- Subnet address range: 10.20.30.0/24
After adding subnets, select Review + create.
Verify validation passes, then select Create.

Task 3: Create the “ManufacturingVnet” Virtual Network and Subnets
Repeat steps 1–6.
Configure as follows:
Resource Group: ContosoResourceGroup
Name: ManufacturingVnet
Region: (Europe) West Europe
IPv4 address space: 10.30.0.0/16
Add subnets:
ManufacturingSystemSubnet: 10.30.10.0/24
SensorSubnet1: 10.30.20.0/24
SensorSubnet2: 10.30.21.0/24
SensorSubnet3: 10.30.22.0/24
Review, validate, and create.

Task 4: Create the “ResearchVnet” Virtual Network and Subnet
Repeat steps 1–6.
Configure as follows:
Resource Group: ContosoResourceGroup
Name: ResearchVnet
Region: Southeast Asia
IPv4 address space: 10.40.0.0/16
Add subnet:
- ResearchSystemSubnet: 10.40.0.0/24
Review, validate, and create.

Task 5: Verify the Creation of VNets and Subnets

In the Azure portal home page, select All resources.
Verify the following VNets exist:
CoreServicesVnet
ManufacturingVnet
ResearchVnet
For each VNet:
Select the VNet.
Under Settings, select Subnets.
Confirm all subnets and IP address ranges are correct.
Key Takeaways
Azure Virtual Network is the building block for your private network in Azure.
Ensure non-overlapping address spaces between networks.
Subnets allow resource segmentation and future expansion planning.
Always reserve extra IP space for future subnet growth.
M01 - Unit 6 Configure DNS settings in Azure
Exercise Scenario
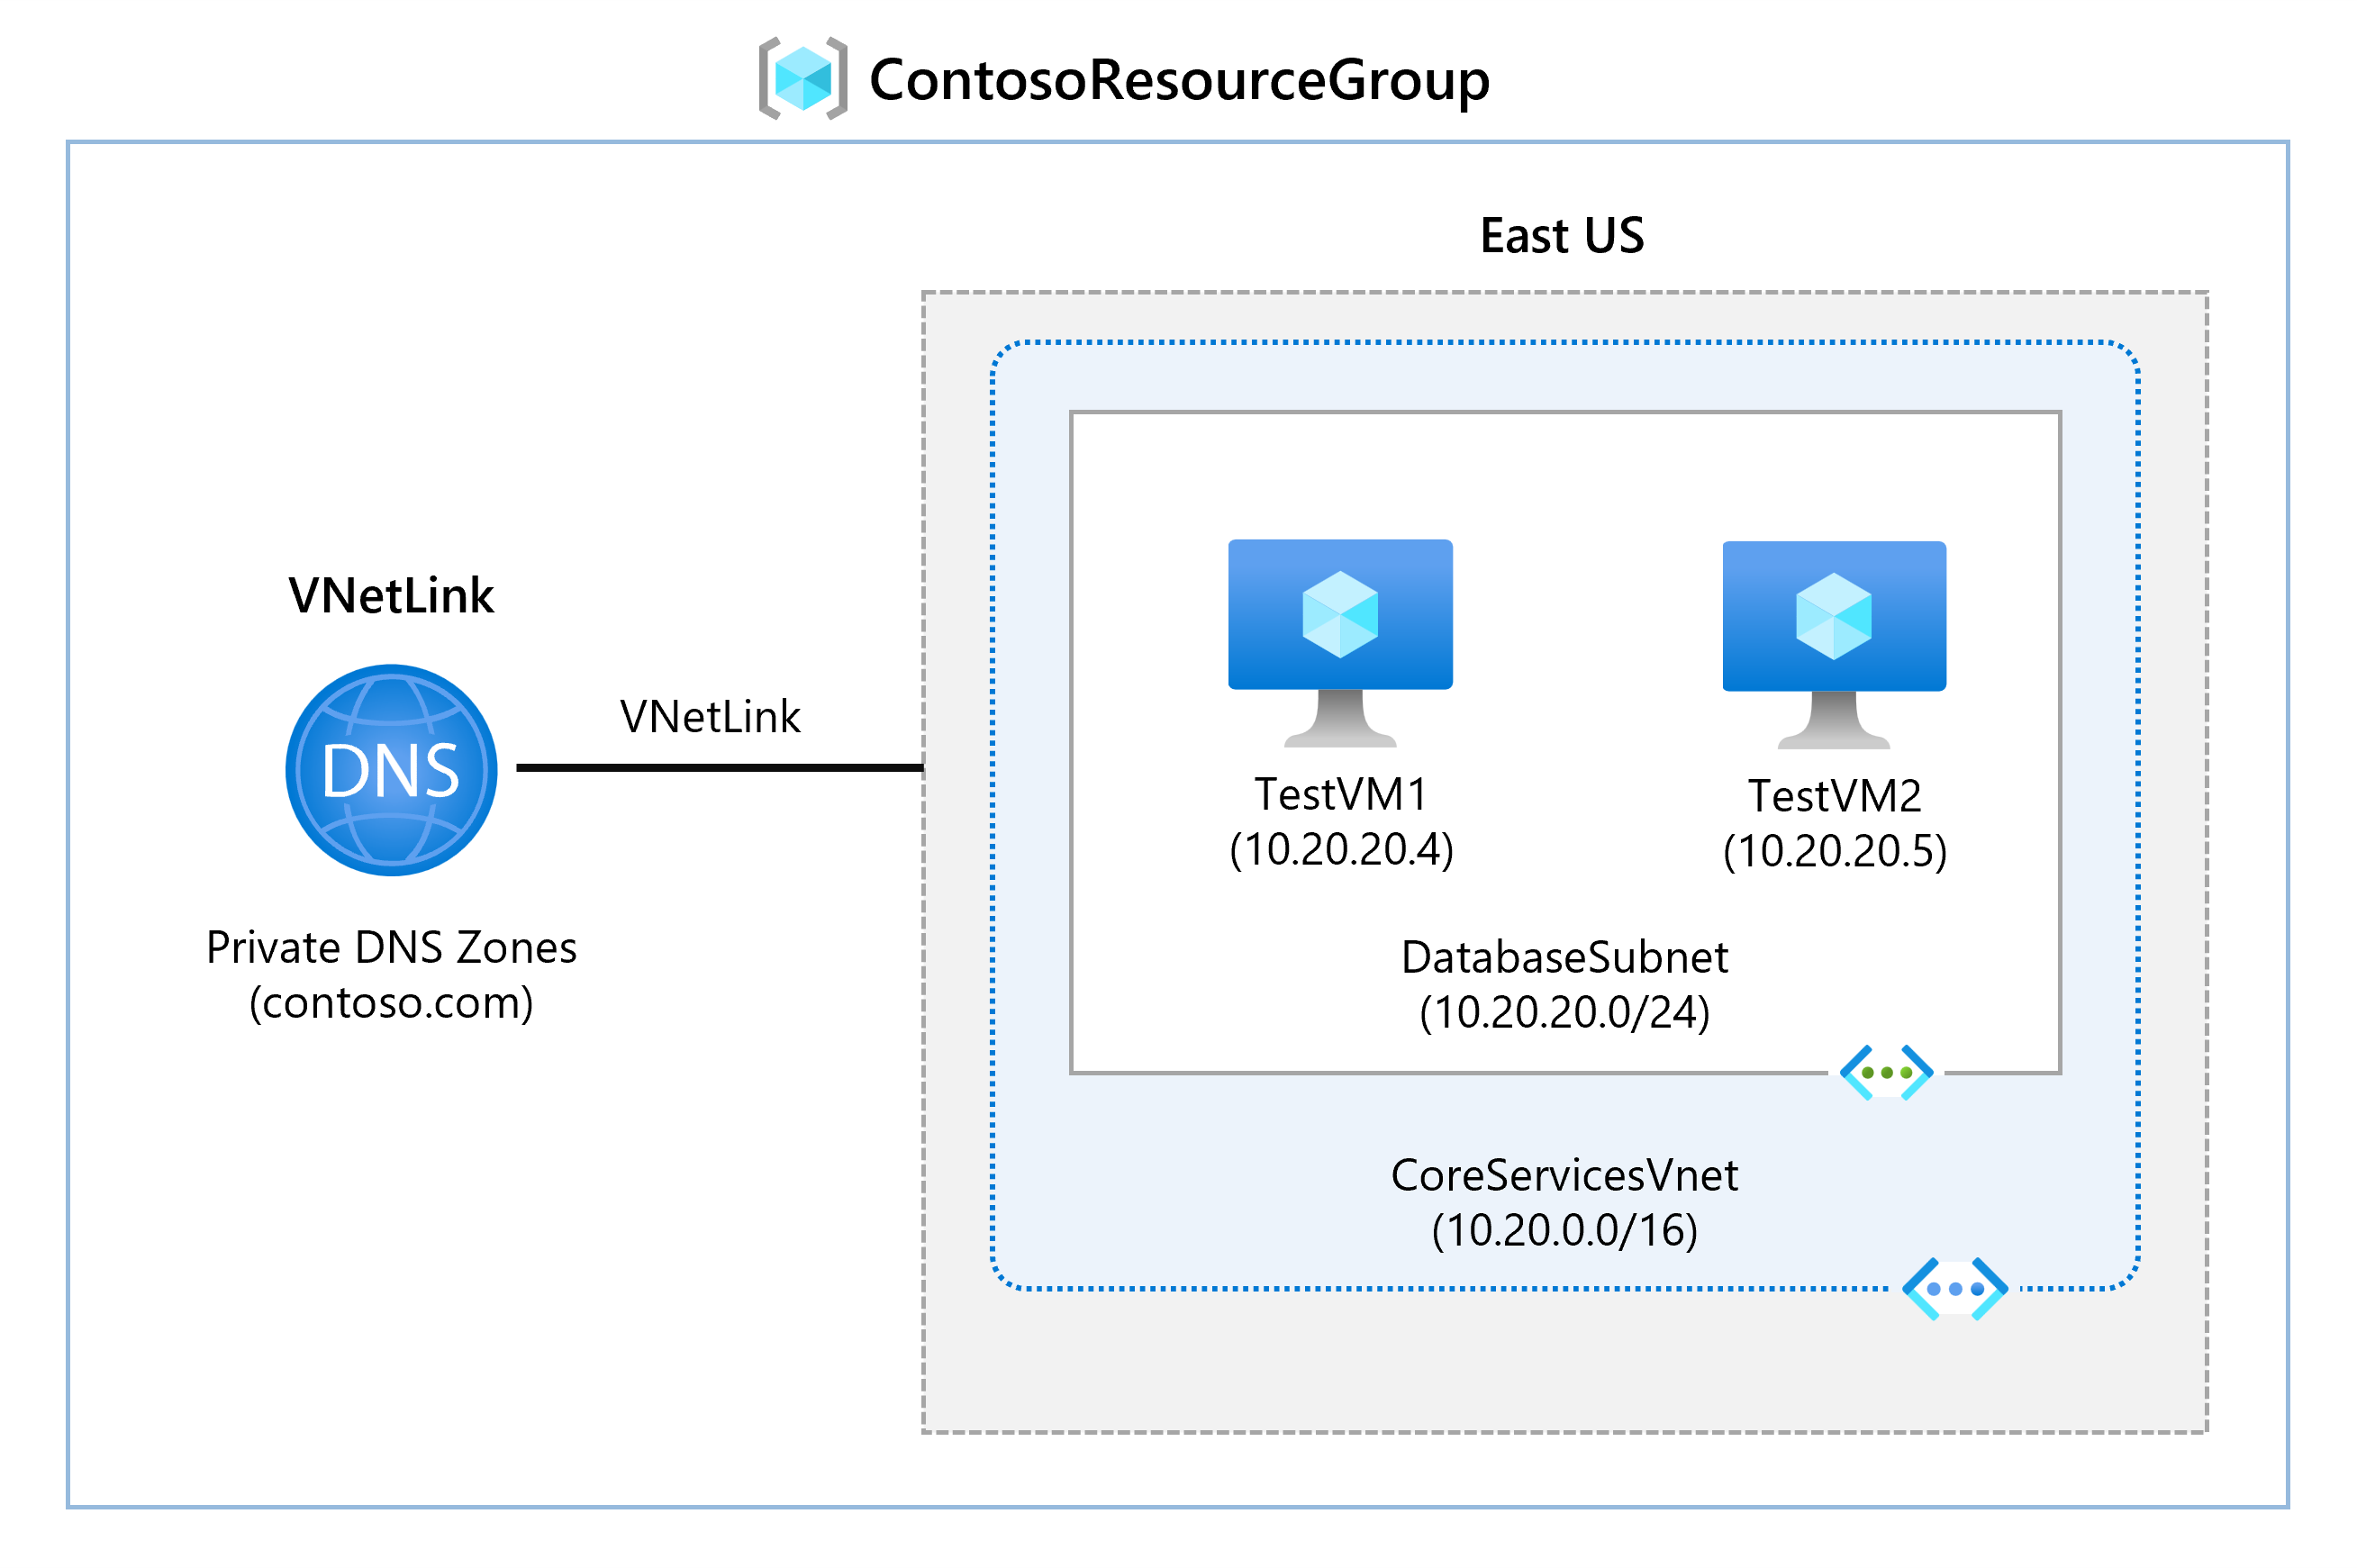
In this unit, you will configure DNS name resolution for Contoso Ltd. You will create a private DNS zone named contoso.com, link VNets for registration and resolution, create two VMs, and test the configuration.
Tasks:
Task 1: Create a private DNS Zone
Task 2: Link VNets for auto registration
Task 3: Create Virtual Machines to test the configuration
Task 4: Verify records in the DNS zone
Click on the picture below for more info:
Task 1: Create a Private DNS Zone

Go to the Azure Portal.
In the search bar, enter DNS and select Private DNS zones.
Select + Create and fill in:
Resource Group:
ContosoResourceGroupName:
contoso.com
Select Review + create, then Create.
Task 2: Link VNets for Auto Registration
In
contoso.com, under DNS Management, select Virtual network links → + Add.Add the following links:
CoreServicesVnetLink
Virtual Network:
CoreServicesVnetAuto registration: Enabled
ManufacturingVnetLink
Virtual Network:
ManufacturingVnetAuto registration: Enabled
ResearchVnetLink
Virtual Network:
ResearchVnetAuto registration: Enabled
After each, select Refresh and verify the links and auto-registration are enabled.


Task 3: Create Virtual Machines to Test
In the Azure portal, open the Cloud Shell (top-right icon). Select PowerShell.
Upload files
azuredeploy.jsonandazuredeploy.parameters.jsonfromF:\Allfiles\Exercises\M01.Run the following command:
 powershellCopyEdit$RGName = "ContosoResourceGroup"
 New-AzResourceGroupDeployment -ResourceGroupName $RGName -TemplateFile azuredeploy.json -TemplateParameterFile azuredeploy.parameters.json
After deployment, verify two VMs are created in Virtual Machines.
Task 4: Verify Records in DNS Zone
In Private DNS zones, open
contoso.com.Verify host (A) records for both VMs are listed.
Note their names and IP addresses.

Connect to Test VMs via RDP
In Virtual Machines, select TestVM1 → Connect > RDP → Download the RDP file.
Repeat for TestVM2.
Connect to the VMs and on both VMs:
Accept Privacy settings if prompted.
Select Yes if asked about Network discoverability (may not appear on Windows Server).
Test Name Resolution
On TestVM1:
Open Command Prompt.
Run: ipconfig /all (Verify IP matches what you noted earlier.)
Run: ping TestVM2.contoso.com (Ping may timeout because of Windows Firewall.)
Alternatively, run: nslookup TestVM2.contoso.com (Verify successful name resolution.)
Extend Your Learning with Copilot
Use copilot.microsoft.com to explore:
- Differences between Azure DNS and Azure Private DNS.
| Feature | Azure DNS (Public) | Azure Private DNS |
| Visibility | Public — resolvable over the internet | Private — resolvable only within your Azure VNets |
| Use case | Host internet-facing domain names (e.g. websites) | Internal name resolution for Azure resources |
| Example domain | www.contoso.com | vm1.contoso.local or vm1.contoso.com (private use) |
| Who can query it? | Any device on the internet | Only VMs within linked virtual networks |
| Typical usage | Websites, APIs, mail servers | Internal VM-to-VM communication |
| Linked VNets required? | No | Yes (must link VNets to the private zone) |
| Zone types | Only public | Private (with optional auto-registration) |
Purpose of auto-registration in Azure Private DNS.
No need for manual DNS record management.
Ensures DNS is always up to date — even if VMs restart or their IPs change.
Great for dynamic environments where VMs are created and deleted often.
Key Takeaways
Azure DNS hosts DNS domains for public and private use.
Public zones resolve domains over the internet.
Private DNS zones manage DNS inside Azure VNETs.
DNS zones are collections of DNS records mapping domain names to information.
2- link subnet

M01 - Unit 8: Connect Two Azure Virtual Networks Using Global Virtual Network Peering
Exercise Scenario
In this lab, you will configure connectivity between CoreServicesVnet and ManufacturingVnet by setting up global VNet peering.
Tasks:
Task 1: Create a Virtual Machine to test the configuration
Task 2: Connect to Test VMs using RDP
Task 3: Test the connection between the VMs
Task 4: Create VNet peerings between CoreServicesVnet and ManufacturingVnet
Task 5: Test the connection again
Task 1: Create a Virtual Machine (ManufacturingVM)
Open Azure Portal → Click Cloud Shell → Choose PowerShell.
Select No Storage Account required if prompted, then Apply.
Upload these files to Cloud Shell:
ManufacturingVMazuredeploy.jsonManufacturingVMazuredeploy.parameters.json
Deploy the VM:
 $RGName = "ContosoResourceGroup"
 New-AzResourceGroupDeployment -ResourceGroupName $RGName -TemplateFile ManufacturingVMazuredeploy.json -TemplateParameterFile ManufacturingVMazuredeploy.parameters.json
After deployment, verify that ManufacturingVM is created.
Task 2: Connect to the Test VMs Using RDP
Go to Virtual Machines → Select ManufacturingVM → Connect > RDP → Download RDP File.
Save and connect (Repeat for TestVM1.)
On both VMs:
Accept privacy settings.
Select Yes for network discoverability (if prompted).
On TestVM1, open PowerShell, run: ipconfig, note the IPv4 address.
Task 3: Test Initial Connection Between VMs
On ManufacturingVM, open PowerShell.
Test connectivity to TestVM1's IP (example
10.20.20.4):Test-NetConnection 10.20.20.4 -Port 3389- Connection should fail (no peering yet). ( VMs are in two different VNets: TestVM1 is in CoreServicesVnet & ManufacturingVM is in ManufacturingVnet)
Task 4: Create VNet Peerings
In Azure Portal, go to Virtual Networks → Select CoreServicesVnet → Peerings → + Add.
Configure:
Peering link name:
CoreServicesVnet-to-ManufacturingVnetVirtual Network:
ManufacturingVnetEnable:
Allow CoreServicesVnet to access ManufacturingVnet
Allow forwarded traffic
In ManufacturingVnet, create reverse peering:
Peering link name:
ManufacturingVnet-to-CoreServicesVnetEnable:
Allow ManufacturingVnet to access CoreServicesVnet
Allow forwarded traffic
Verify both peerings show Connected.


Now the connection should succeed (TCP test succeeded: true).
Task 5: Test Connection Again
On ManufacturingVM, run:
Test-NetConnection 10.20.20.4 -Port 3389
Clean Up Resources
In Cloud Shell (PowerShell), run:
Remove-AzResourceGroup -Name 'ContosoResourceGroup' -Force -AsJob- Resources will delete asynchronously.
Extend Your Learning with Copilot
Try these prompts:
What are the most common errors when configuring Azure virtual network peering?
Overlapping IP Ranges: VNets have overlapping address spaces — peering fails.
One-Way Peering Only: Peering is not set up in both directions.
“Allow Traffic” Not Enabled: Required traffic settings are missing during peering setup.
NSGs Blocking Traffic: Network Security Groups block communication even after peering.
Gateway Transit Misconfigured: Incorrect gateway settings when sharing VPN or ExpressRoute.
Missing Permissions Across Subscriptions: Insufficient rights to peer VNets in different subscriptions.
Global Peering Blocked by Policy: Policies prevent cross-region VNet peering.
If I peer VNet1 with VNet2 and VNet2 with VNet3, is VNet1 automatically peered with VNet3?
- No, VNet1 is not automatically peered with VNet3. Azure VNet peering is not transitive.
Can firewalls and gateways affect Azure VNet peering?
- Yes — firewalls and gateways can affect Azure VNet peering communication.
How firewalls affect peering:
NSGs (Network Security Groups) or Azure Firewall can block traffic between peered VNets.
Even if peering is correctly set up, if:
NSGs block inbound or outbound traffic, or
Azure Firewall doesn’t allow the route,
➤ VMs won’t be able to communicate.
How gateways affect peering:
Peering doesn’t automatically share VPN or ExpressRoute gateways.
To share a gateway:
In Hub VNet, enable “Allow gateway transit”.
In Spoke VNet, enable “Use remote gateway”.
Missing either setting = gateway traffic fails.
Key Takeaways
Azure VNet peering allows seamless communication between VNets.
Global peering connects VNets across different Azure regions.
Traffic between peered VNets uses Microsoft’s private backbone (not public internet).
You can resize VNet address spaces without downtime when VNets are peered.