For the complete learning material, please click here or visit Microsoft learn website.
Key Capabilities of Azure Virtual Networks
Enable communication with the internet
Facilitate communication between Azure resources
Support hybrid connectivity with on-premises environments
Provide network traffic filtering through security groups and firewalls
Allow for custom routing of network traffic
Virtual Network address space:
| RFC 1918 | Azure Reserved IPs | Unavailable Address Ranges |
| 10.0.0.0 – 10.255.255.255 (/8) | x.x.x.0: Network address | 224.0.0.0/4 (Multicast) |
| 172.16.0.0 – 172.31.255.255 (/12) | x.x.x.1: Default gateway | 255.255.255.255/32 (Broadcast) |
| 192.168.0.0 – 192.168.255.255 (/16) | x.x.x.2 & x.x.x.3: Azure DNS mapping | 127.0.0.0/8 (Loopback) |
| x.x.x.255: Broadcast address | 169.254.0.0/16 (Link-local) |
| | 168.63.129.16/32 (Internal DNS) |
Azure frequently utilizes internal DNS to facilitate communication between internal resources. 168.63.129.16 doesn’t tell clients what IP to have, but it enables:
DNS to resolve other IPs
Access to metadata, including their own assigned IPs
Communication with Azure’s control and health systems
It’s essential to keep this IP reachable for smooth VM operation
Some Azure services like VPN Gateway and Azure Bastion require a dedicated subnet in your VNet. Azure uses this space to provision and manage the service within your private network.
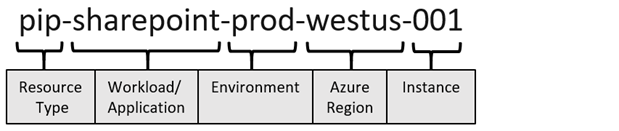
Naming convention for a public IP resource for a production SharePoint workload residing in the West US region might be pip-sharepoint-prod-westus-001:
Use of DHCP are not allowed in azure.
Based on what services we chooses size of the network will match:


Internet facing resources:

We can choose two major IP SKUs but we recommend using the Standard SKU all the times:
| Basic SKU(Retiring in Sep 2025) | Standard SKU |
| Assigned with static or dynamic allocation method | Always use static allocation method |
| Open by default. NSGs are recommended but optional | Secure by default and closed to inbound traffic |
| Assigned to network interfaces, VPN gateway, public load balancers, or Application Gateways | Allow inbound traffic with NSG |
| Doesn’t support availability zone scenarios | Assigned to network interfaces, standard public load balancers, or Application Gateways |
| Can be zone-redundant, zonal, or no-zone |
BYOIP (Bring Your Own IP)
Rather than creating a Public IP you can go through the process of route authorization workig with registry to proof your own the IP Address and use it in azure.
Three phase process to bring an IP prefix to azure:
Validation
Porovision
Commision
How do we create a Public IP in Azure: We choose our RG and region (public IPs are differ per region in azure) and then choose regional and not global for now..and then it will create one from range of IPs that we have.

or we can create a public IP Prefix its almost the same except its only available for Standard SKU and also some different things about the prefix that we want:

After creation:

Designing Name Resolution
Public DNS:
Public DNS services resolve domain names to IP addresses for resources accessible over the internet, such as web servers. Azure DNS is a hosting service for DNS domains that enables name resolution using Microsoft Azure’s global infrastructure.
Within Azure DNS, you can manually create address records in the appropriate DNS zones. The most commonly used record types include:
Azure DNS Zones:

A DNS zone hosts the DNS records for a domain
The same zone name can be reused in a different resource group or a different Azure subscription
Where multiple zones share the same name, each instance is assigned different name server addresses
Root/Parent domain is registered at the registrar and pointed to Azure Name Servers
DNS Delegation

When delegating a domain to Azure DNS, you must use all four name servers provided by Azure DNS.
After creating the DNS zone, update the parent registrar with the Azure DNS name servers.
For child zones, add the corresponding NS records to the parent domain to complete the delegation.
DNS Record Sets
A record set is a group of DNS records within a zone that share the same name and record type.
Azure DNS supports all standard DNS record types, including: A, AAAA, CAA, CNAME, MX, NS, PTR, SOA, SRV, and TXT.
A record set cannot contain duplicate records.
Changing the record type using the drop-down menu will alter the required input fields.

Design Name Resolution
DNS for Private Domains
Use custom domain names for internal resources
Enables name resolution for virtual machines within and across virtual networks (VNets)
Automatically manages hostname records
Eliminates the need for custom DNS solutions
Supports all common DNS record types
Available in all Azure regions
With private zone in azure we get auto registration of new resources as they get created. So we dont need to go create the new record every time we create new resources
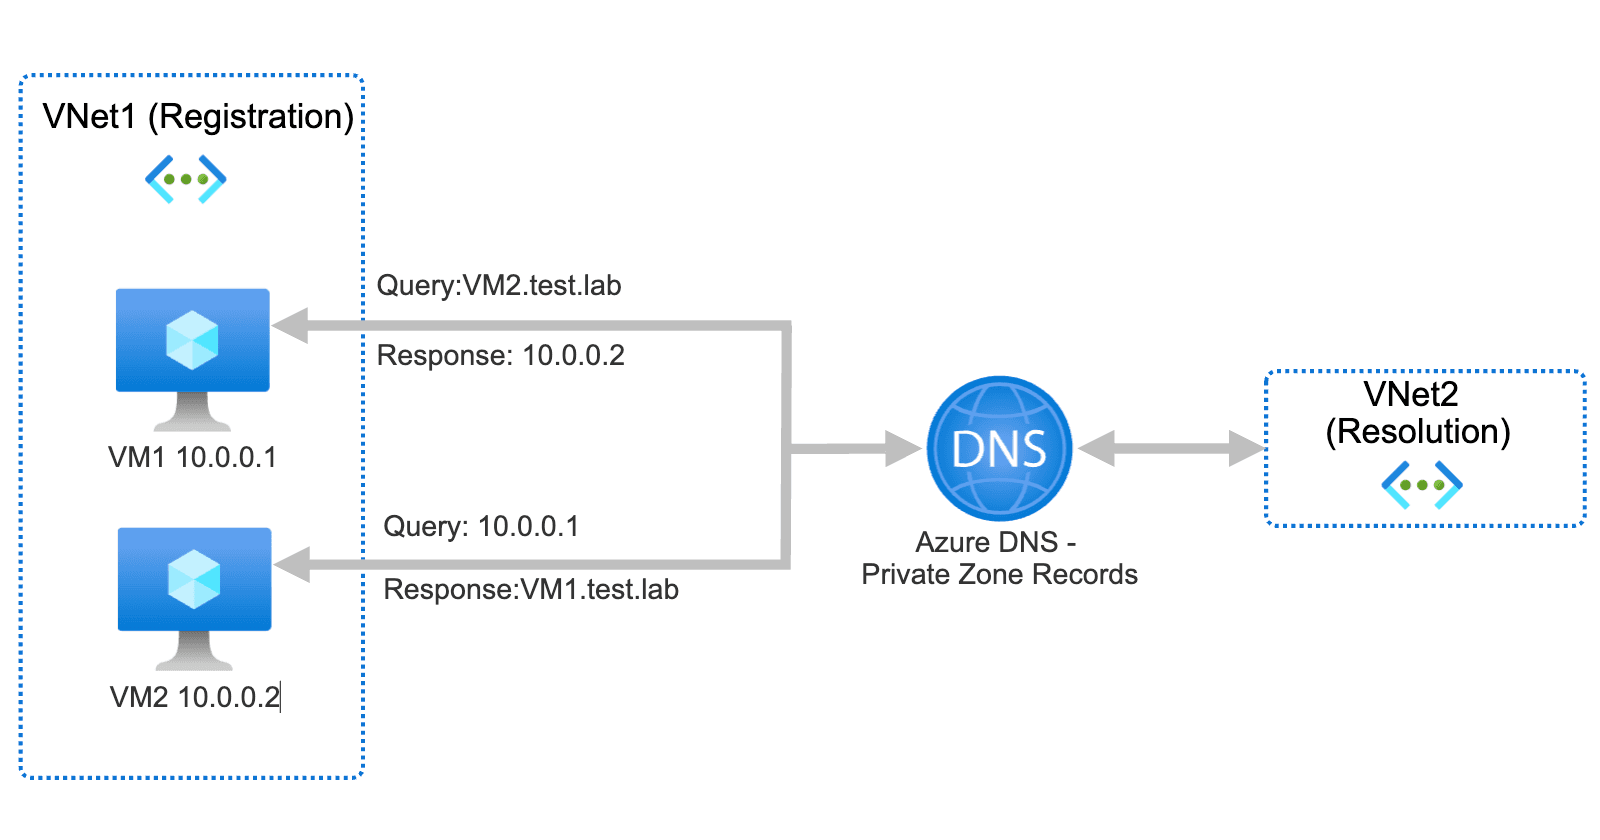
Private zone scenario:
In the setup below, a virtual network is configured so that every new virtual machine added to it automatically updates DNS records to reflect the new instance. On the left-hand side, VNETs are marked for registration.
To accomplish this, a private DNS zone was created through the Azure portal, and the virtual network was pointed to it. As a result, any new resources—such as virtual machines assigned a private IP—will automatically have a DNS record created in the Azure DNS private zone. If a virtual machine is later deleted, its corresponding DNS record will also be automatically removed.
Also user can find and resolve the name/IP of these VMs from any associated VNet and there is a big reason why this is happening significance of IP address 168.63.129.16!

Significance of IP address 168.63.129.16
This is a special IP address that Azure uses to send important information—like metadata—to resources inside a virtual network. It plays a key role in things like DHCP requests, “ready” signals from VMs, and most importantly, DNS resolution. Thanks to this IP, virtual machines in Azure can contact the Azure Resource Manager and discover other resources using DNS.
Then, Azure reserves the IPs x.x.x.2 and x.x.x.3 in each subnet to help complete these DNS requests. It’s important to understand what this IP does and how it supports communication inside the virtual network.
So in short 168.63.129.16:
Enables the VM Agent to communicate with the Azure platform to signal that it is in a “Ready” state
Enables communication with the DNS virtual server to provide filtered name resolution to the resources (such as VM) that do not have a custom DNS server
Enables health probes from Azure load balancer to determine the health state of VMs
Enables the VM to obtain a dynamic IP address from the DHCP service in Azure
Enables Guest Agent heartbeat messages for the PaaS role
This setup is designed to work within Azure, but what happens if you’re in a hybrid environment (part on-premises, part in Azure)?
There are a couple of ways to handle it. First, let’s talk about how you can manage DNS yourself. You’re not required to use Azure’s built-in DNS services—if you already have your own DNS servers, you can absolutely use them.
In fact, you can set up a combination of your own DNS servers and forwarders to manage DNS requests for private DNS zones in Azure.
Let’s walk through an example of how this would work.
In the on-premises environment, DNS zones and supporting servers are already in place to handle internal name resolution.
To extend this capability into Azure, DNS queries related to Azure virtual networks can be forwarded from the on-premises environment. Azure virtual networks can be configured to use on-premises DNS servers. If those servers are unable to resolve a query, the request can be forwarded to a DNS forwarder within Azure.
This approach enables name resolution for Azure-based resources in hybrid environments. The only requirement is a functional DNS server or forwarder hosted in Azure to process the unresolved queries.
For further details on implementing DNS in hybrid setups, consult the official Microsoft Learn documentation on name resolution strategies.
Provide Your Own DNS Solution
When setting up your own DNS in a hybrid or custom environment, make sure to:
Provide proper host name resolution for internal resources.
Enable recursive resolution to resolve external domain names (like websites on the internet).
Ensure your DNS server is accessible on TCP and UDP port 53. Update NSG rules (Network Security Groups) to allow traffic to your DNS listener endpoint.
Secure your DNS against public internet access to protect against external threats and attacks.
Enable Cross-VNet Connectivity with Peering
Understanding VNet Peering in Azure
VNet peering is a straightforward yet powerful way to enable communication between virtual networks.
🔹 Same Region Peering
When two virtual networks are located in the same Azure region, regional VNet peering is used. This setup is common in scenarios like:
🔹 Cross-Region Peering
VNet peering can also span across different Azure regions. In this case, Azure uses its backbone network to enable private communication between Region A and Region B.
This is especially useful when:
🔹 Setup and Configuration
Whether you’re working in the same region or across regions, the configuration process is nearly identical. You can use:
Azure Portal
Azure CLI
ARM Templates
During setup, you’ll define:
⚠️ Important Considerations
🔁 Peering Flexibility
VNet peering supports:
This flexibility makes it a strong solution for organizations with diverse network architectures.

Here’s a refined and structured version of your explanation, great for documentation or presentation:
Common Scenarios for VNet Peering

Scenario 1 : Hub-and-Spoke with a Network Virtual Appliance (NVA)
In this setup, a spoke VNet (e.g., VNet A) connects to a central hub that hosts shared resources, such as a network virtual appliance (NVA)—commonly a firewall or security device.
As long as there is no overlapping address space, this configuration is simple and effective.
Scenario 2 : Centralized Gateway with Gateway Transit
Another common architecture involves connecting Azure VNets to an on-premises network through a centralized VPN or ExpressRoute gateway located in a hub VNet.
This allows:
Spoke VNets (like VNet B) to reuse the central gateway to reach on-prem resources.
Centralized control, reducing both cost and security exposure.
Better management of traffic flow and access policies across the environment.
Centralizing access to gateways, NVAs, and firewalls helps maintain network consistency and security.
Key Takeaways
VNet peering is essential for scalable, secure, and cost-efficient architectures.
Use custom routes for controlled traffic flow.
Enable Gateway Transit to optimize hybrid connectivity.
Ensure non-overlapping address spaces for all peered VNets.
Service chaining
One key advantage of using a hub-and-spoke peering model is service chaining.
By leveraging a central hub to control route next-hops and manage traffic flows, we can enforce secure, streamlined, and controlled communication between different segments of the network.
Service chaining means intentionally routing traffic through a specific set of network services or appliances—usually in a central hub—before it reaches its destination.
e.g. Instead of allowing traffic to go directly from one VNET to another, you’re forcing it to pass through the hub.
In that hub, you might have things like a firewall, an IDS/IPS, a routing or inspection appliance (e.g., a third-party NVA or Azure Firewall)
The hub “chains” these services together so every packet must pass through your chosen security and control layers.
So, “service chaining” = a controlled, centralized path where traffic is inspected, filtered, or modified before reaching its destination.
This allows you to:
Apply consistent security policies
Monitor traffic centrally
Avoid exposing VNets directly to each other

You can see here in the Azure portal, several virtual networks are already up and running. The goal is to create a global peering between two hub networks—specifically linking the East US hub with the West US hub.
To begin:
The East US virtual network is selected.
From the left-hand menu, the Peerings section is accessed.
Existing peerings may be visible—such as one connecting to a spoke—demonstrating that a virtual network can support multiple peerings, which is essential in a hub-and-spoke topology.


In this model:
The next step involves establishing a hub-to-hub peering. Although the architecture differs, the configuration steps remain the same as standard VNet peering.
By selecting Add, a configuration panel is presented where:
A peering name can be defined (e.g., “hub-eastus-to-hub-westus2”).
Access permissions between the virtual networks are configured.
Options such as forwarded traffic—which allows routing through the hub—can be enabled.
Only the basic access and forwarding options will be selected at this stage, as a gateway has not yet been configured.


We need to set it up in opposite direction so the process is then repeated in the West US hub, creating the reciprocal connection back to the East US hub (e.g., “hub-westus-to-hub-eastus”).


Although peering is bidirectional, Azure treats each direction as a separate resource. When Add is selected, two deployments are triggered—one for each direction.
With these steps completed, a global hub-to-hub connection is successfully established.


After refreshing, the connection will show as Connected. You can click into the hub at any time to view or modify details. Some defaults may have been adjusted automatically based on available settings.
If full synchronization is shown, the setup is complete. Further customizations are optional.
At this point, the virtual networks are linked, and resources can communicate securely over the private connection you’ve set up.

From the virtual networks view, the West US hub can be checked. Under Peerings, the reverse connection will appear, confirming successful pairing. Connection details are visible, and changes can be made as needed. If subnet settings are updated, use the Sync button to apply them.
Azure Virtual Network Traffic Routing (Default Behavior)
When you create a virtual network (VNet) in Azure, traffic is managed by a default system route table—even if you don’t configure anything manually. This ensures basic connectivity from day one.
Azure supports three types of routes:
Default routes – Built-in for internal traffic and internet access.
Optional default routes – Auto-added in specific scenarios like VNet peering.
Custom routes (UDRs) – User-defined and always take priority over default routes.


By default:
Traffic can flow within and across subnets inside a VNet.
Traffic stays within the VNet unless peering or another connection is added.
An internet route is included by default (though this may change in the future).
Custom route tables can be applied at the subnet level, and Azure’s defaults remain as a fallback if needed.
What is “fallback” in this context?
In Azure, “fallback” means that if no custom route matches the traffic, then Azure will automatically use the default or optional default routes instead.
So, if you apply a custom route table to a subnet and it doesn’t explicitly cover certain traffic (like internet-bound traffic or traffic to another subnet), Azure’s built-in routes will still handle that traffic unless you’ve overridden them.
Custom Virtual Network Routing in Azure
Azure uses default routing, but User Defined Routes (UDRs) let you change traffic flow to meet needs like security, compliance, or efficiency.

Next hop settings control how traffic flows—and that can make or break your network’s security and performance.
Applying a Route Table in Azure
Once you have a route table set up, you can enforce custom traffic flows by associating it with a subnet.
Example:
This small change enforces custom routing, impacting traffic flow significantly.
Another common use: Routing traffic back to on-premises—another strong case for using custom route tables.

Forced Tunneling:
- Purpose: Redirect all outbound traffic to a specific device for inspection.
For forced tunneling add a default route:
Prefix: 0.0.0.0/0
- Next hop: VPN Gateway (not Virtual Appliance in this case)
Associate the route table to the required VNet subnet(s).
VPN Gateway Requirements:
Must be a route-based VPN gateway.
A default site connection must be defined among on-premises sites.
The on-prem VPN device must use 0.0.0.0/0 as traffic selectors to accept all traffic.

Benefits:
Why not Virtual Appliance for forced tunneling via VPN?
Azure doesn’t allow internet-bound traffic to exit via an NVA by default unless that NVA has internet access and specific routing (which defeats the purpose of forced tunneling to on-prem).
When you want to force all internet traffic to go back to your on-premises environment (for inspection, filtering, etc.), it must be routed to the VPN Gateway.
Azure will only forward that traffic through a VPN if:
So use:
Propagating Routes in Azure
By default, user-defined routes (UDRs) only affect the subnet they’re assigned to. If you want those routes to extend beyond that subnet—for example, to your network appliances—you’ll need a way to dynamically share and propagate them.
This is where Azure Route Server (ARS) comes in.
What Is Azure Route Server?
Azure Route Server enables dynamic routing by using BGP (Border Gateway Protocol) to exchange routes between your Azure virtual network and your network virtual appliances (NVAs).
Why Use BGP?
BGP lets different network devices (even from different vendors) communicate available IP ranges to one another.
It supports bulk route sharing efficiently, using route prefixes.
It’s dynamic: when routes change, updates are propagated automatically.
What Azure Route Server Does
Learns routes from Azure route tables.
Advertises those routes to NVAs that support BGP.
Withdraws routes automatically when they’re removed in Azure.
Helps eliminate manual route configuration on third-party appliances.
When to Use Azure Route Server
You’re using third-party NVAs in your Azure environment.
You want automatic route propagation.
You need to minimize configuration overhead and reduce the chance of manual errors.
You want a scalable and dynamic routing setup.
Azure Virtual Network NAT (NAT Gateway)
Azure NAT Gateway controls outbound internet traffic from a subnet using network address translation (NAT).
How to Use It
Create a NAT Gateway
Assign public IPs
Associate it with a subnet
All outbound traffic from that subnet now flows through NAT Gateway. Also return traffic follows the same path (stateful)
Inbound Coexistence
Inbound access can use a load balancer
Outbound traffic uses NAT Gateway
Works together without conflict
How to Set Up an Azure NAT Gateway
- Go to the Azure Portal> NAT Gateways (under the Networking section)> Create.

- Basics: Name, Region: same region as your virtual network (e.g., East US).


Outbound IP Configuration
Associate with Subnets

- Review & Create: Review your settings & Click Create.
What Happens Next?
The NAT Gateway is integrated into your VNet.
All outbound traffic from the associated subnets will use the configured static public IP(s).
No further changes are required on your VMs.