AZ-104 Challenge Labs
A
I’m Amir Rouhanipoor, an IT Consultant specializing in Azure and cloud solutions. I help organizations streamline their IT and drive growth through secure, efficient cloud technologies.
Search for a command to run...
I’m Amir Rouhanipoor, an IT Consultant specializing in Azure and cloud solutions. I help organizations streamline their IT and drive growth through secure, efficient cloud technologies.
No comments yet. Be the first to comment.
PowerShell Script for VM Size Comparison This script lists all session hosts with their host pool, VM name, and VM size across all host pools(loop through multiple resource groups): Connect-AzAccount # Get all host pools $hostPools = Get-AzWvdHostPo...
M03 - Unit 4: Configure an ExpressRoute Gateway Exercise Scenario To connect your Azure virtual network to your on-premises network using ExpressRoute, you must first create a virtual network gateway. A virtual network gateway serves two key purposes...
M02-Unit 3 Create and configure a virtual network gateway Scenario You will configure a VPN gateway to securely connect CoreServicesVnet (East US) and ManufacturingVnet (North Europe) using VNet-to-VNet VPN. Task 1: Create CoreServicesVnet and Manuf...
Introduction Azure ExpressRoute is a private, enterprise-grade connection that enables secure and reliable network connectivity between your on-premises infrastructure and Microsoft’s global network. It bypasses the public internet and provides high ...
You need to create three virtual networks: 1. CoreServicesVnet Region: East US Purpose: Main network (web services, databases, shared services like DC/DNS). Connectivity: Needs VPN connection to on-premises. Address Space: Large (because of expe...
Security-focused Cloud & Automation Engineer with a Master’s in Computer Science and 6+ years of experience automating and supporting enterprise IT environments across multi-site corporate and operational infrastructures. Proficient in Python scripting, Azure infrastructure, Windows Server, and identity management. Skilled in integrating third-party platforms, securing configurations, and streamlining operations. Currently pursuing the Cybersecurity Architect Expert certification with a strong focus on cloud security and automation.
For more challenge lab please visit Skillable website.
# Define the variables
$userPrincipalName = "dev-test@example.com"
$resourceGroupName = "test-rg"
$roles = @(
    "Storage Account Contributor"
    "Virtual Machine Contributor"
    "Network Contributor"
)

# Loop through the roles and assign them to the user
foreach ($roleName in $roles) {
    New-AzRoleAssignment -RoleDefinitionName $roleName -SignInName $userPrincipalName -ResourceGroupName $resourceGroupName
}
dev-test@example.com developer account to manage certain resources in the test-rg resource group by adding the following role assignments: Storage Account Contributor, Virtual Machine Contributor, Network Contributor.Note the operations for read, start, and deallocate.
You can use the operations associated with an Azure resource as actions when you create an Azure role-based access control (RBAC) custom role.
Want to learn more? Review the documentation on the Get-AzProviderOperation cmdlet.
# Get all operations for virtual machines (using a wildcard)
$vmOperations = Get-AzProviderOperation "Microsoft.Compute/virtualMachines/*"

# Identify read, start, and deallocate operations
$readOperation = $vmOperations | Where-Object { $_.Operation -match "read" }
$startOperation = $vmOperations | Where-Object { $_.Operation -match "start/action" }
$deallocateOperation = $vmOperations | Where-Object { $_.Operation -match "deallocate/action" }

# Output the relevant operations
Write-Host "Read Operation:"
$readOperation | Format-Table Operation, Description # Corrected line

Write-Host "Start Operation:"
$startOperation | Format-Table Operation, Description # Corrected line

Write-Host "Deallocate Operation:"
$deallocateOperation | Format-Table Operation, Description # Corrected line

You can use Azure role-based access control (RBAC) role assignments to grant access to resources at a specific scope—subscription, resource group, resource—by assigning a role to a user, group, service principal, or managed identity. There are two types of roles that you can use: built-in and custom. You can create a custom role by using the Azure portal, Azure PowerShell®, Azure command-line interface (CLI) 2.0, and the REST API.
Want to learn more? Review the following documentation:
# Get the role definition for the Virtual Machine Contributor role
$roleDefinition = Get-AzRoleDefinition -Name "Virtual Machine Contributor"

# Convert the role definition to JSON format
$jsonRoleDefinition = $roleDefinition | ConvertTo-Json

# Output the JSON to the specified file
$jsonRoleDefinition | Out-File -FilePath $home\clouddrive\VMOperatorRole.json
If prompted, switch to Cloud Shell classic mode, and then run the commands again.
You can edit the definition of a built-in role by using the Azure Cloud Shell code editor, and then you can save the definition as a new custom role.
Want to learn more? Review the documentation on Azure Cloud Shell code editor.

code ~/clouddrive/VMOperatorRole.jsoncode ~/clouddrive/VMOperatorRole.json

You can create a new custom role in Azure using the New-AzRoleDefinition cmdlet and your VMOperatorRole.json file. Run the following command in Azure PowerShell:
New-AzRoleDefinition -InputFile "home\clouddrive\VMOperatorRole.json"
In this, you will configure a network security to allow secure (SSH) connections to a virtual machine. First, will create application security group, followed by creation of a network security. Next you will associate the security group with a subnet in the virtual network, and then you associate the application security group with the network interface on the virtual.


Finally, you will add an inbound security rule, and then you will verify that you can connect to the linux virtual machine in the subnet by using SSH.

Connect to the virtual machine at azureadmin@74.235.217.96 by using an SSH connection
first try before creating the rule was time out and second one after adding the rule to the nsg:

Configure Front End:
Create a Route table named app-frontend-rt by using the RG1lod49100900(909 here) resource group and the East US region, and then disable gateway route propagation.

Add a route named to-backend to the app-frontend-rt route table, and then configure the route by using an address prefix of 10.1.1.0/24 and a Virtual appliance next hop address of 10.1.255.4.

Associate the app-frontend-rt route table to the frontend subnet in the app-vnet virtual network.

You can associate a route to a subnet by using the Azure portal, the Set-AzVirtualNetworkSubnetConfig and Set-AzVirtualNetwork cmdlets, or the az network route-table route command.
Configure back-end:
Create a Route table named app-backend-rt that uses the RG1lod49100900 resource group and the East US region, and then disable gateway route propagation. (process same as above)
Add a route named “to-frontend” to the app-backend-rt route table, and then configure the route by using an address prefix of 10.1.0.0/24 and a Virtual appliance next hop address of 10.1.255.4.


Open an Azure Cloud Shell Bash session without mounting a storage account.
Create a secure shell (SSH) connection to VM3(Linux Machine) by using azureuser@20.172.210.22, and then when prompted, enter AzurePwd49100909 as the password.


In Cloud Shell, create an ssh connection to VM2 by using azureuser@4.236.142.95, and then when prompted, enter AzurePwd49100909 as the password.
In the SSH session, update the virtual machine by using sudo and apt-get.

Ensure that you have updated the Linux virtual machine before moving on to the next task.


In this challenge, you will configure a virtual network peering between the virtual networks for two applications hosted in different Azure regions.
First, you will review existing Azure resources, and then you will verify that you are unable to add virtual network peerings between the existing virtual networks.
Next, you will remove overlapping address spaces in the virtual network configuration. Finally, you will configure global virtual network peering between the two virtual networks.
VM1 Public IP: 172.206.208.169
vNet1 address space: 10.1.0.0/16
vNet2 address space: 10.1.0.0/16
The address spaces of virtual networks that you intend to connect should not overlap. You will correct this in an upcoming task.
Attempt to add a virtual network peering named VNET1-to-VNET2 to the VNET2 virtual network.
A successful virtual network peering would allow traffic to flow in both directions between the VNET1 and VNET2 virtual networks.
You can use a virtual network peering to connect virtual networks together. For connectivity purposes, Azure will view the connected networks as if they are one network, and traffic will be routed between the peered virtual networks across the Microsoft backbone rather than through a gateway. For this reason, traffic between peered virtual networks will never traverse the public internet.
You can choose between two types of peering:
Virtual network peering connects virtual networks in the same region.
Global virtual network peering connects virtual networks in different regions.
You can use user-defined routes to implement service chaining by configuring a virtual machine in the peered virtual network as the next hop IP address.
You can also configure a gateway in a peered virtual network as a transit point to an on-premises network. This is referred to as gateway transit.

Add an address space of 10.2.0.0/16 to VNET2.

When you design the address ranges of your subnets, remember that the first three IP addresses in each subnet are reserved by Azure for internal use.


Verify that the peering status of VNET1-to-VNET2 is Connected.


In this Challenge Lab, you will configure high availability by using availability sets. First, you will create an availability set and a virtual network. Next, you will deploy two Azure virtual machines to the availability set. Finally, you will configure load balancing.
Availability sets help distribute virtual machines (VMs) across multiple fault domains (for power and hardware failure protection) and update domains (to stagger reboots during maintenance).
You first create an Availability Set in Azure.

A virtual network (VNet) named “AVSet-Vnet” is created.
This allows communication between the virtual machines deployed within it.
Two Azure Virtual Machines (VMs) are created and assigned to the Availability Set.
Each VM is placed in a different fault and update domain to ensure redundancy:
Fault Domains: Protect against hardware failures (e.g., racks in different power circuits).
Update Domains: Ensure that updates and reboots happen in phases without taking down all VMs at once.

After you deploy the virtual machines, each one should be in a separate fault and update domain for high availability.

An Azure Load Balancer is deployed to distribute traffic evenly across the VMs.
This ensures no single VM handles all requests, improving performance and availability.


A Health Probe is configured to check the health of VMs.
The probe ensures that only healthy VMs receive traffic, rerouting requests away from failed or unhealthy instances.


A Load Balancing Rule is created to define how traffic is distributed across the VMs.
It typically specifies:
Frontend IP
Backend pool (VMs in the availability set)
Port rules (e.g., HTTP on port 80)
Health probe association


You have successfully completed the following tasks:
Created an availability set to ensure high availability.
Deployed two Azure virtual machines within the availability set.
Integrated an Azure load balancer with the availability set.
Configured a health probe for the load balancer.
Defined a load balancing rule to manage traffic distribution.
Outcome
By following these steps, you achieve:
Improved high availability: No single failure (hardware, update, or maintenance) brings down the service.
Load distribution: Requests are balanced across multiple VMs.
Automated failover: If one VM fails, traffic is rerouted automatically.
In this challenge, you will create an Azure storage account with a public container, upload files to the account, and test public access to the account.
Create a storage account by using standard performance, locally redundent storage and on advanced page allow enabling anounymous access on individual containers.

Add a blob container named public on the storage account and set the public access level to Blob (in data storage select containers and add it there)

you can find the access key in security and networking
Upload any image file (for example, .JPG, .PNG, or .GIF) on your computer to the public container, in the sa49292475 storage account, as a 64 KiB block blob by using the Hot access tier.

Add a Blob index tag on the uploaded blob file by using the Key/Value pair of source / Portal. Click on the file and on the blob page , scroll down to Blob index tag

In the same page you can see the URL property of the blob file here:

Note that the list of blob files is sorted by file name alphabetically not by creation time.
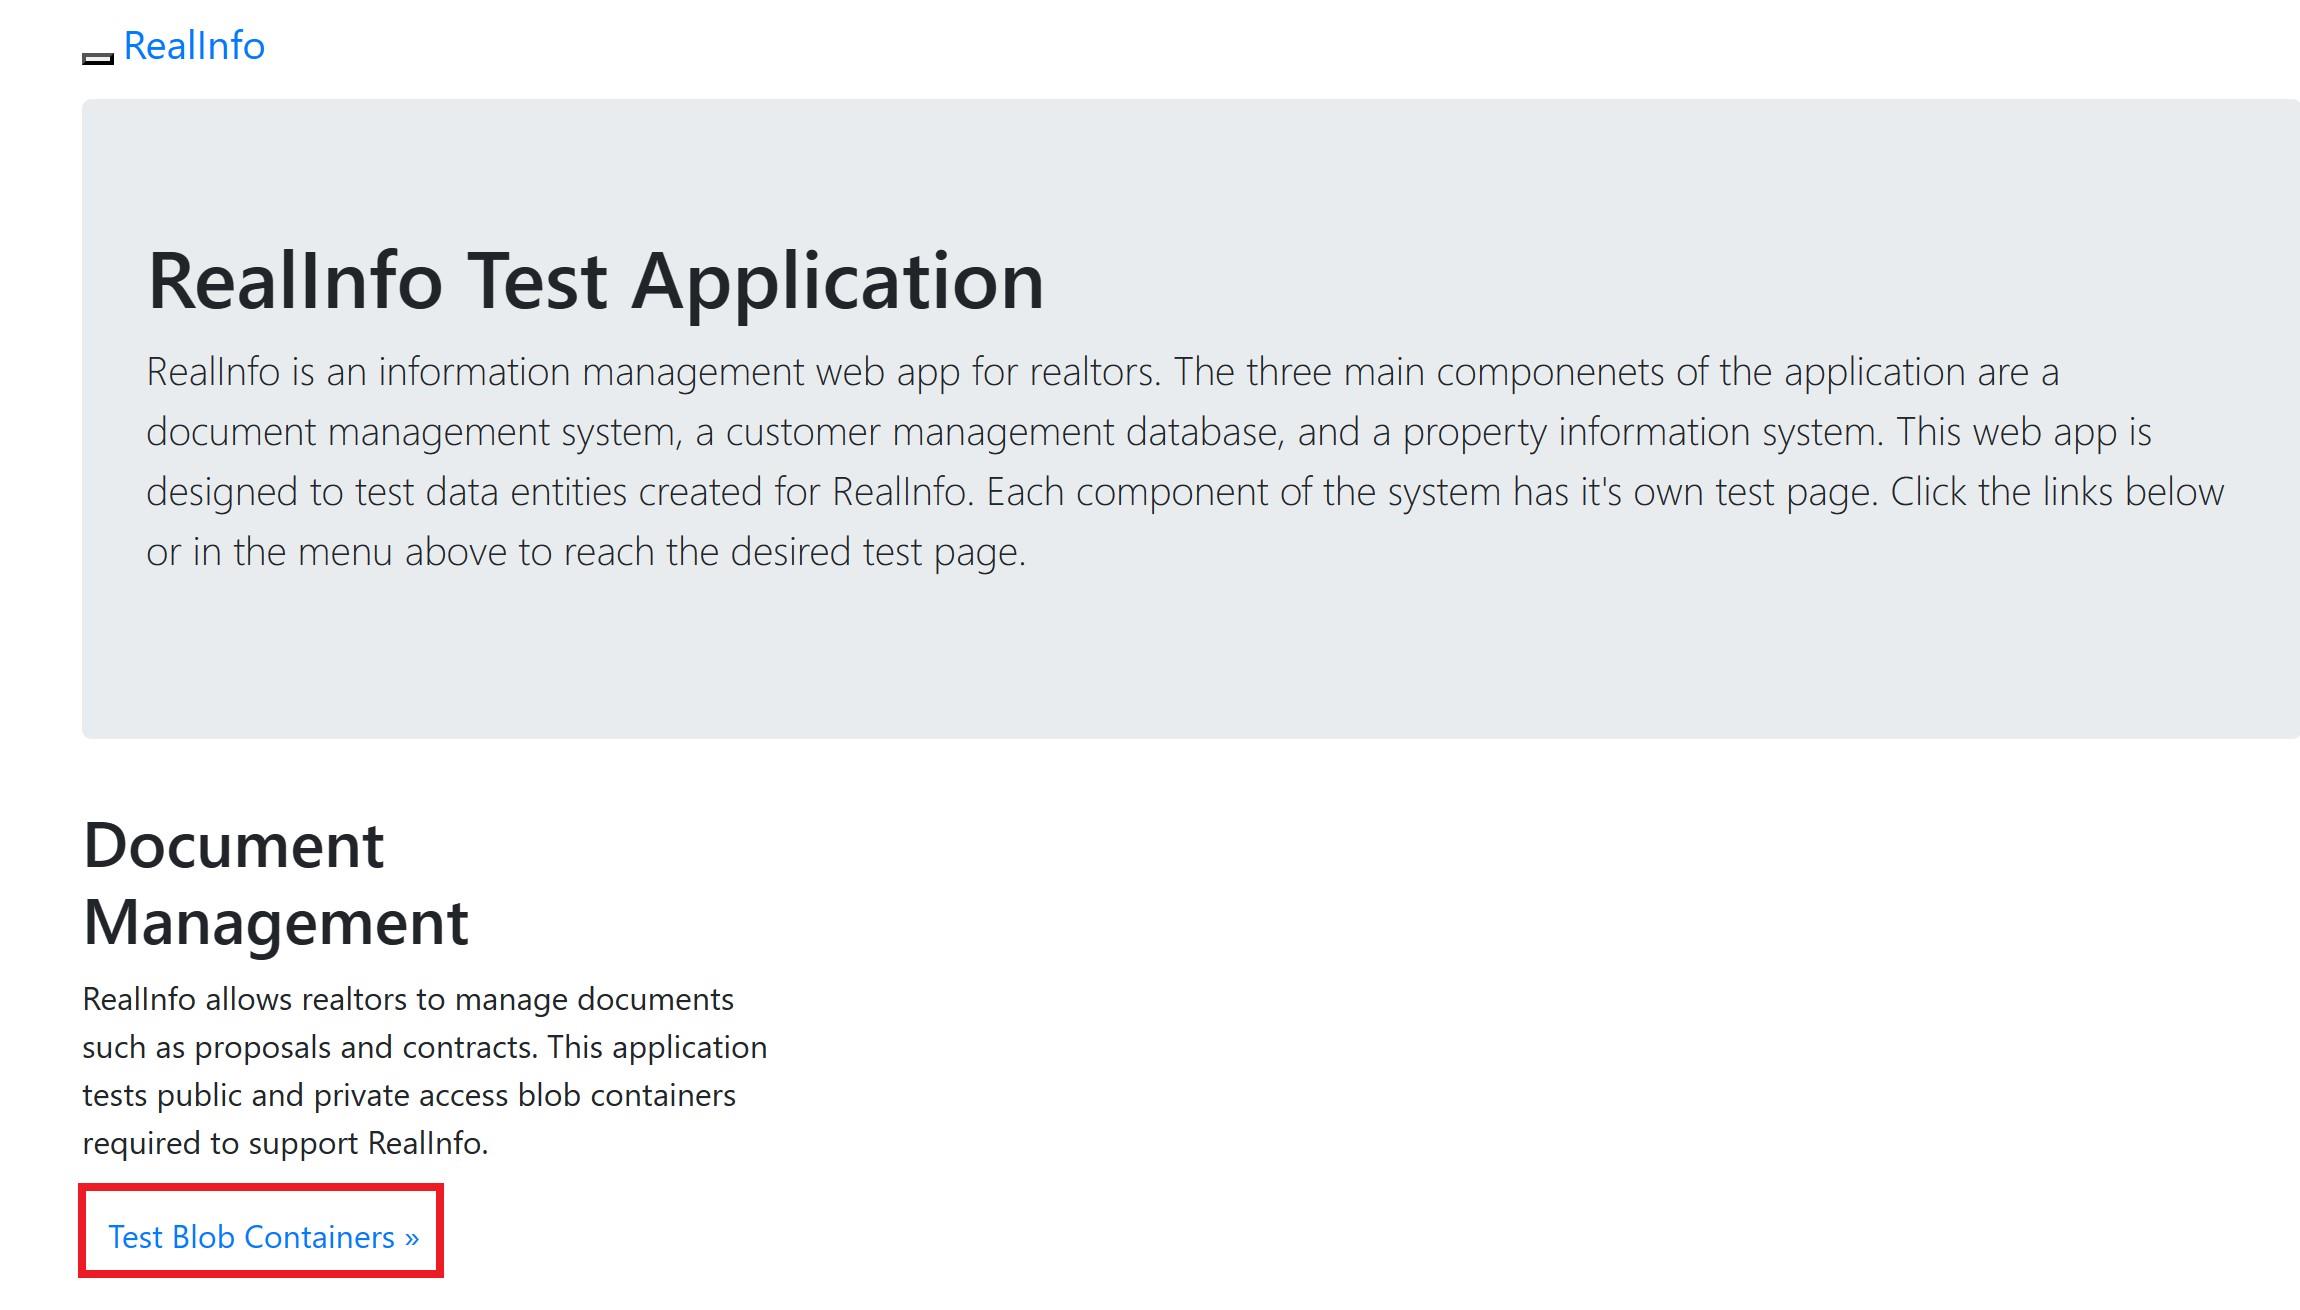
Open the Web App home page from the wa49292475 app service blade in the portal, and then select the Test Blob Containers link to open the File Test page.
On the Azure portal home page, select All resources, and then select the wa49292475 App Service.
On the wa49292475 Overview page, in default domain, select the wa49292475.azurewebsites.net link to open the home page.

On the home page, select the Test Blob Containers link to open the File Test page.
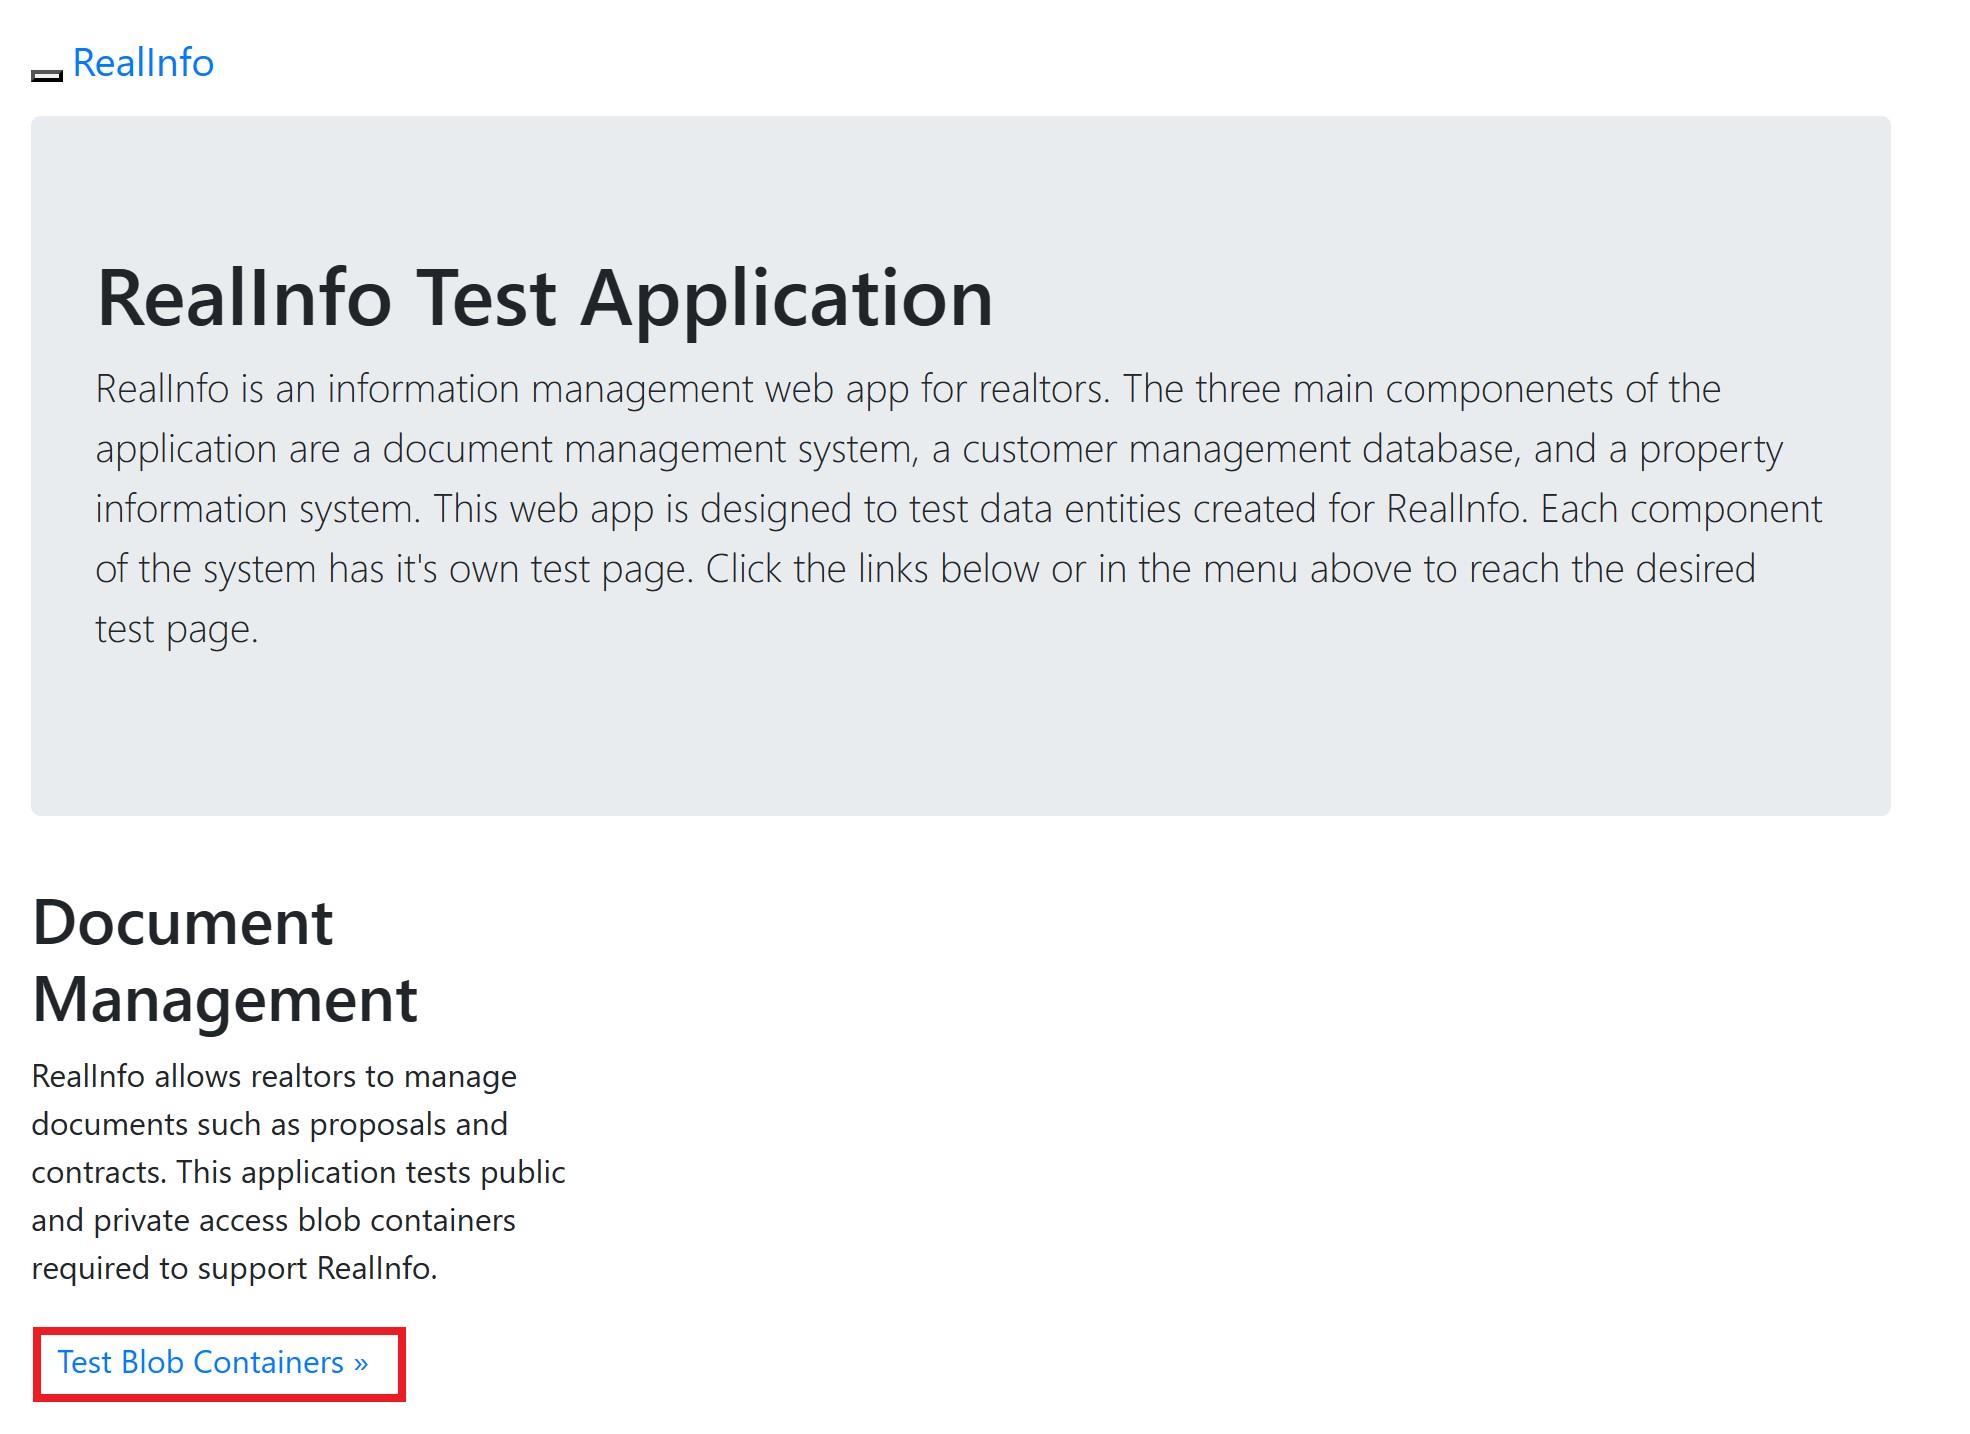
The File Test page should be displayed.
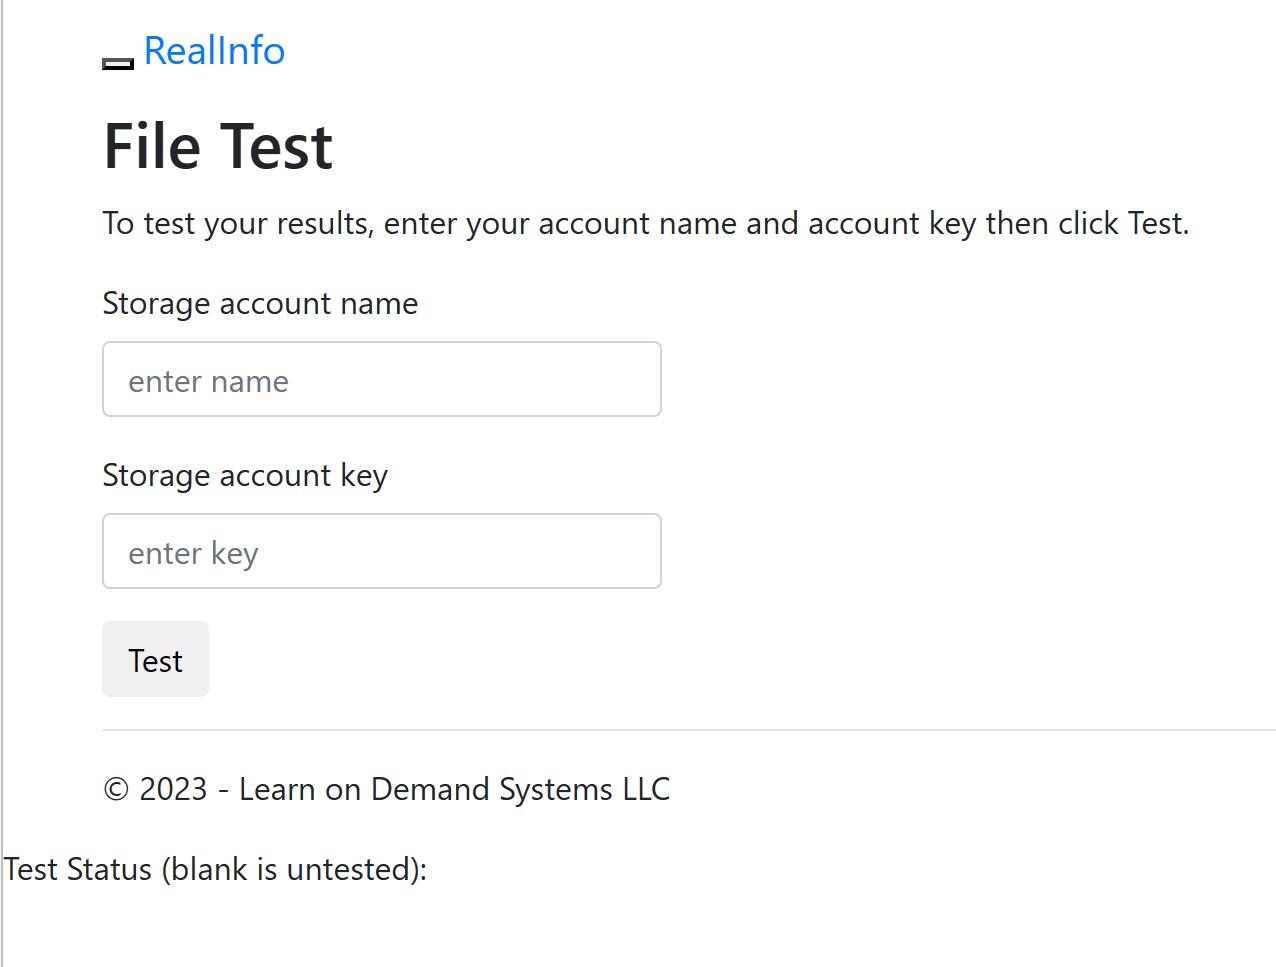
put the storage account name and key and click on test then the File Test page should be displayed after the test.

The Test Status should be set to 1 to show success.
You have provided the storage account name and the access key to the web app so it has full access to the storage account and is able to list the blob files in the container.
When you open the blob files by using the links provided, you are then accessing the files by using anonymous read operations outside of the application. This shows the blob public access level in action.
In this Challenge Lab, you will configure storage for various binary large object (blob) files used by a web app. First, you will create a storage account that has a private blob container, and then you will upload blob files to the container. Next, you will generate a shared access signature (SAS), and then you will configure application settings in a web app. Finally, you will test the configuration using a test page provided with the web app.
Create a storage account with standard performance and LRS redundency setting
add a blob container with private access level

Public access level set to Private (the default) means that blobs within the container cannot be read by anonymous request. Permissions must be granted either through a Shared Access Signature (SAS) key or through Role-Based Access Control (RBAC).

Bob index tags can be set when a file is uploaded or afterward. A tag consists of a simple key value pair, and it can be retrieved by applications, by using Azure Cloud Shell, or by using command line (CLI) tools.
Upload a second image with 256 KiB block and Cool access tier with blob index of source/private files

go to web app and add these settings on environment variable, storage name and key:

Add the key:

7. Open the Web App home page from the wa49297340 blade in the portal, ensure that the Status is Running, and then select the Test Blob Containers link to open the File Test page.
Since its not public wee should get an error message:

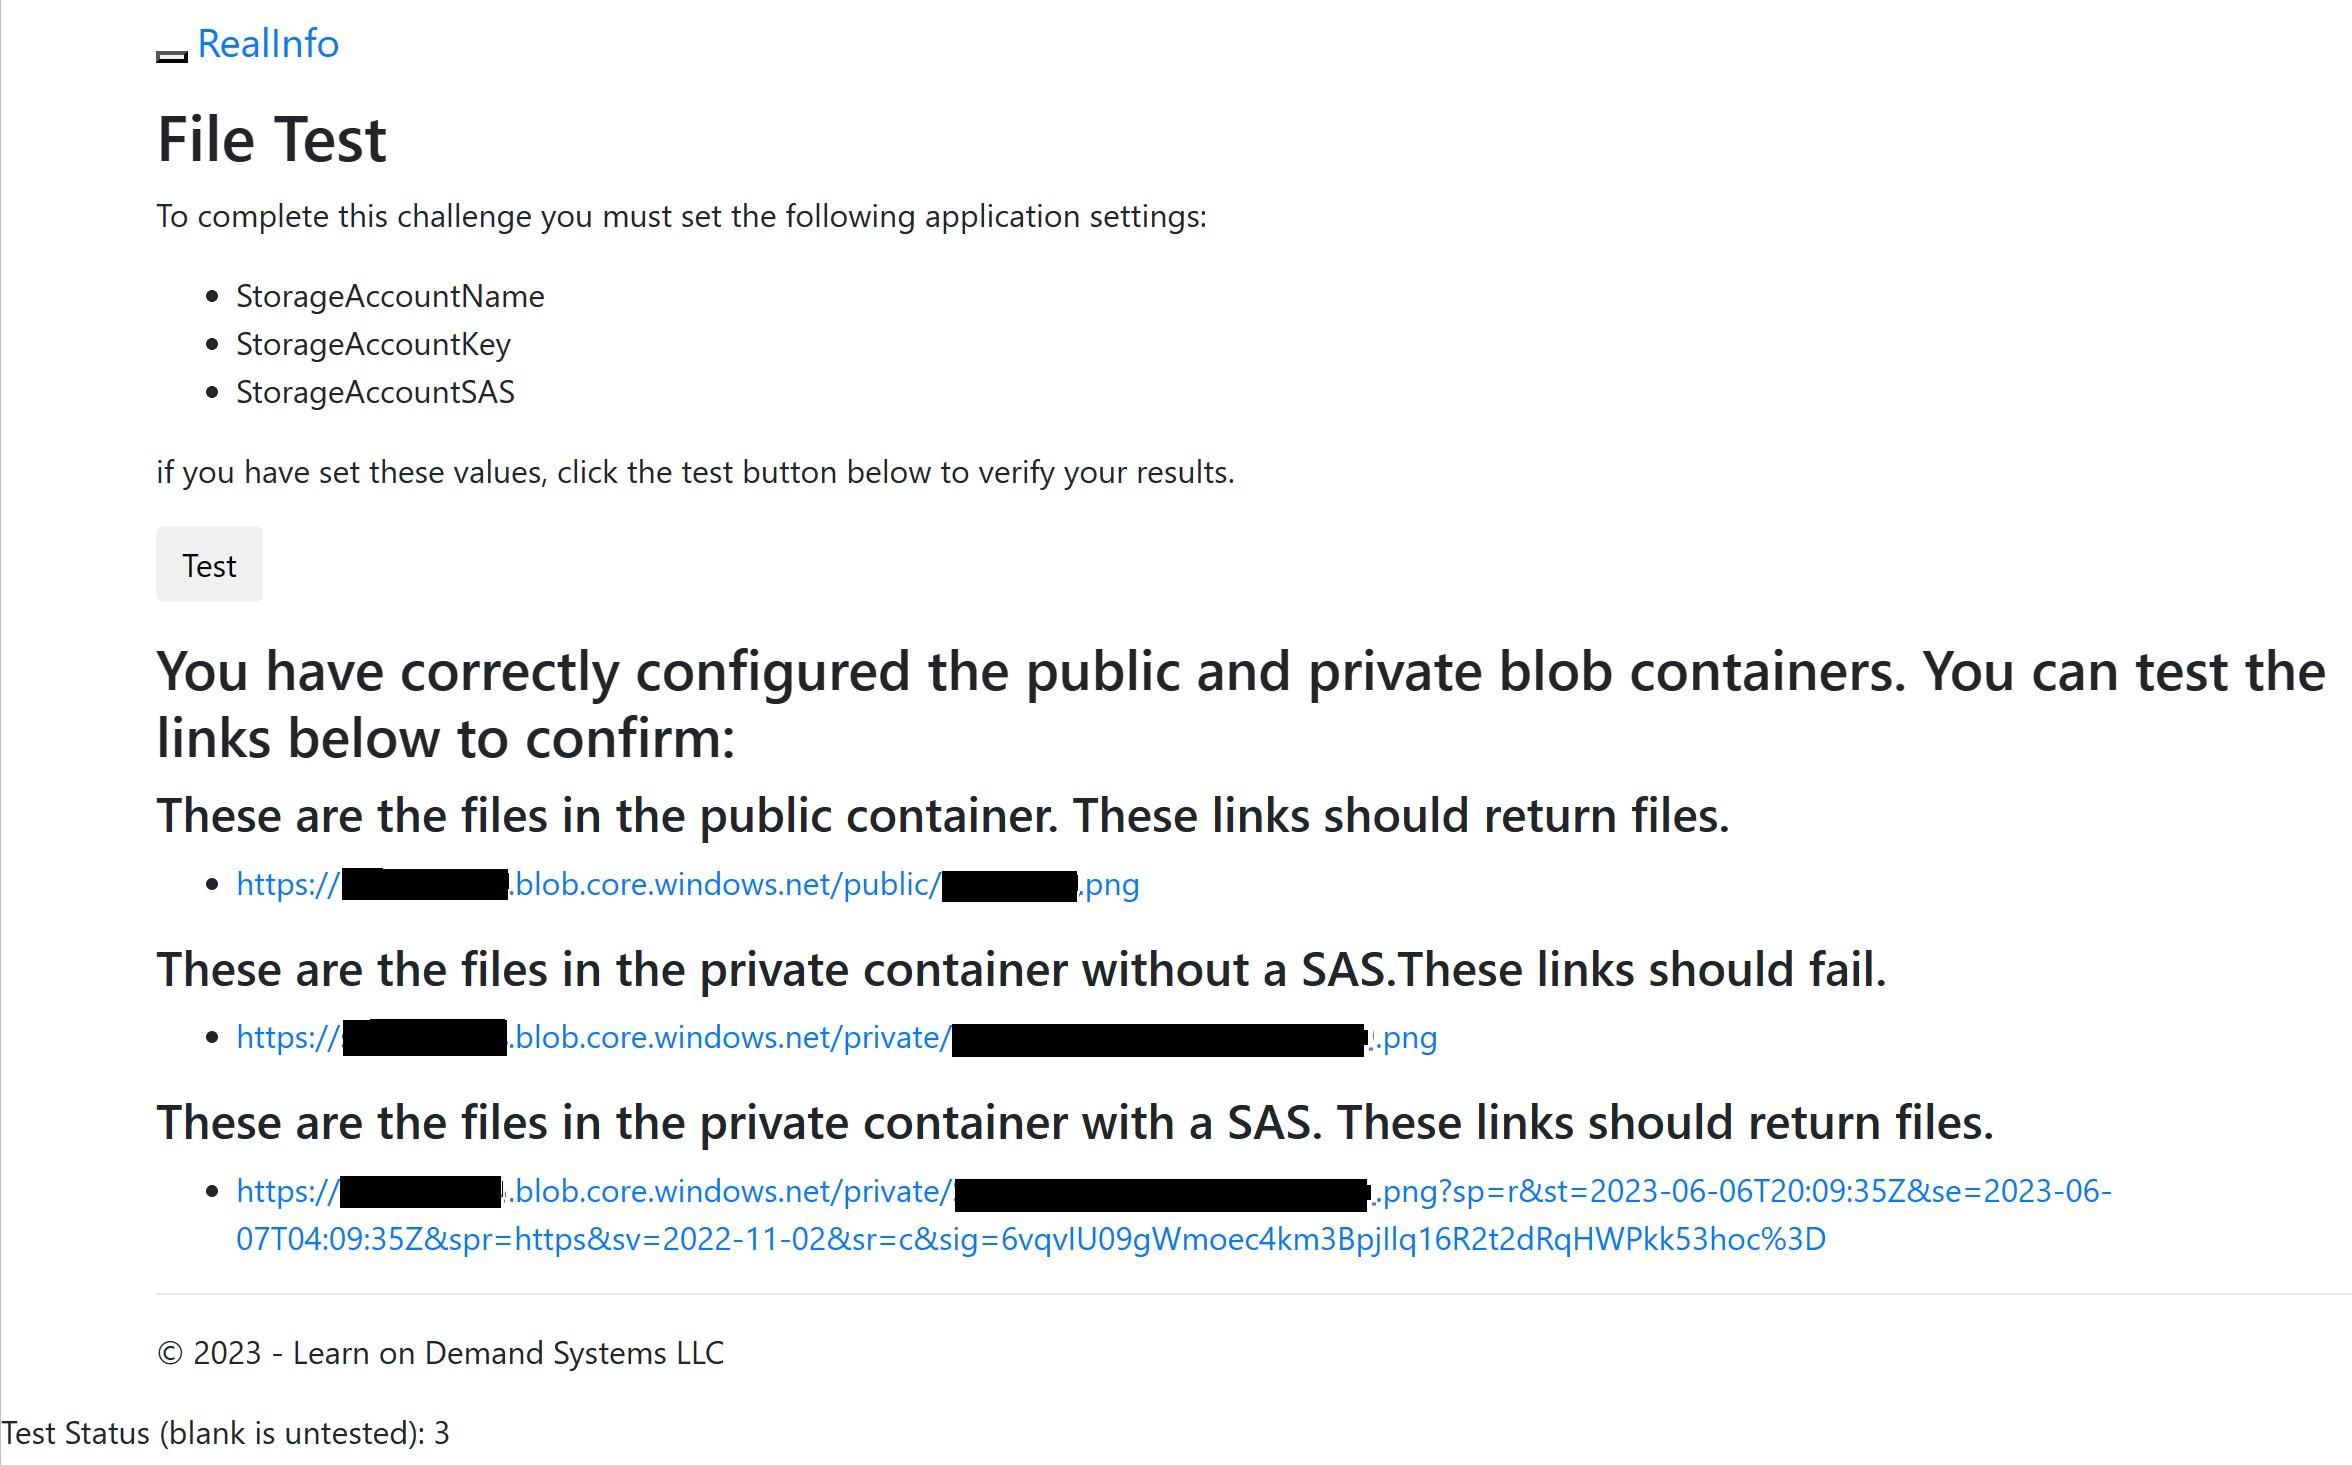
On the File Test page, locate the message: These are the files in the private container with a SAS. These links should return files.
Open the blob files by using the links provided—you should see your image files open in the browser.
In this Challenge Lab, you will configure storage for various files used by a web app. First, you will create a storage account that has public and private blob containers, and then you will upload files to both containers. Next, you will generate a shared access signature for the private container, and then you will configure application settings in a web app. Finally, you will test the configuration using a test page provided by the web app.
Create a storage account with standard performance and LRS setting and enable the anonymous access on advanced tab.
Add a blob container with public access set to blob

Add another one with public access set to private:
Keep record of key1 of storage account access key
Upload an image to public container as a 256 KiB block blob using Hot access tier (Key index source /Portal)
Upload the second image to private container as a 256 KiB block blob using Cool access tier
Generate a SAS token for the private container that allows read access for 8 hours and keep the token value

Add these three applicaion settings to the web app

In this challenge, you will enhance the redundancy of a front-end server tier to ensure continuous application availability during update reboots and potential failures of power sources or network switches. You will begin by creating an availability set, followed by generating an SSH key pair. Finally, you will deploy two Linux virtual machines within the availability set to maintain resilience and uptime.Create a managed availability set named app-frontend-avset in the rg1lod49333628 resource group by using 2 fault domains and 5 update domains.


You can create an SSH key pair by using the ssh-keygen command, and then you can use the key pair when you create a Linux virtual machine in Azure.

| Property | Value |
| Resource group | rg1lod49347139 |
| Name | app-frontend-vm1 |
| Availability options | Availability set |
| Availability set | app-frontend-avset |
| Image | Ubuntu Server latest version LTS - Gen2 |
| Size | DS1_v2 |
| SSH public key source | Use existing public key |
| SSH public key | (Copy the key from your text editor.) |
| Boot diagnostics | Disable |
| Property | Value |
| Resource group | rg1lod49347139 |
| Name | app-frontend-vm2 |
| Availability options | Availability set |
| Availability set | app-frontend-avset |
| Image | Ubuntu Server latest version LTS - Gen2 |
| Size | DS1_v2 |
| SSH public key source | Use existing public key |
| SSH public key | for e.g. ssh-rsa AAAAB3NzaC1yc2EAAAADAQABAAACAQC3pZqVtok84a/Riu83jP4OQwc+1gZMHHvyYf/SeA/JlJeF4RhpKhCgFlN+EGCf99dgvNzcLrn+0Gmga28l354Q124hykCOTZjBbD2J/M0YeS+nciNHkcWjviw419t55ruSF5gpCILiUaRtwYBYsz1y3ee3DRxO4ekA6dhbKLOJ9DuZUyORlqq2quSR4uB0MDr8M1rdF2tpt2oDQnHtabcqy3M4FN6z8B+7GIJba99Vheztc/QEIqW7k9U/JOF6fC80NFvhuihHBxvVRkOJq8ZX+HlvXG45akYrKCyecZfgKySuVZ4FAtdDf0o5QeS/HuLo/tJSSgJTiAVvhJqwwNckGqAR74c0tmjcXFZksTpQoyvzVPEvsS07hPKr2SAXHPXQUGdU1M/vuskJv2pJ2tJ0q2yxL/gaqABW49o7ncxugSK49GRd2ZDEFutdXwCTgh5Y2Rqbk5TN9pGtL7WRznywmKKn9MpdmkFNZV6a9n7/2sQJf7Xk5nCla+W2Hm/3MhInkPKRMq1h9jDn0rMzU1yQUzqDb5+y3+0dzVBgzoCC5HKHsIt1+EcxaXkwgkM20yY4/FCInc+W/0foReakalpe/gRkZAmNasymSyIdbV1kzHlK+NofBe8fbD86jch2RCZEJdVRZIbtlrIAQLFExK4q79a4qkwQH8sjTX81vxAMsw== user1-49347139@SandboxHost-638775051176503819 |
| Boot diagnostics | Disable |

In this challenge, you will configure an Azure virtual machine scale set. First, you will create a scale set that uses load balancing and a common Linux operating system disk image. Next, you will increase the number of virtual machines in the scale set. Finally, you will stop and deallocate a virtual machine instance.
Create a Virtual Machine Scale Set (VMSS) with the following specifications. Use default values for any unspecified properties.
Resource Group: rg1lod49347709
VMSS Name: webappscaleset
Orchestration Mode: Uniform
Image: Ubuntu Server (latest version, x64 Gen2)
VM Size: DS1_v2
Authentication Type: Password
Username: azureuser
Password: ******
Public IP Address: Enabled (NIC Properties)
Load Balancing Options: Azure Load Balancer
Load Balancer Selection: Create a new load balancer
Load Balancer Name: webappscaleset-lb


az vmss scale --resource-group rg1lod49347709 --name webappscaleset --new-capacity 3


In this challenge, you will create a new test virtual machine that is based on an existing managed disk. First, you will prepare to create a snapshot, and then you will create a snapshot of an existing managed disk. Next, you will create a managed disk from the snapshot. Finally, you will create a virtual machine from the new managed disk.
Use the ip of the vm and open the auto-scale web app:

Stop and deallocate the vm
Create a snapshop from the vm disk that you can find in the resource group

Start the vm again
Create a managed disk in the resource group by using snapshot


Restart vm2 to reload the web app
Open the web app on vm2, verify that you get the same web
In this Challenge Lab, you will deploy an Azure virtual machine and configure storage. First, you will create a virtual machine. Next, you will add a data disk to the virtual machine. Finally, you will resize the data disk, and then you will create a snapshot.

create a new disk and attach it to the vm
remote to the vm and initialize the disk and create a folder in the disk
minimize the remote desktop and create the snapshot of the disk
Enable guest-level monitoring for VM1 by using the storage account.


In this challenge, you will provision a container-based environment. The environment will include a container registry, a container instance, and a container-based web app.

Enable admin user for the registry and record the password.

Configure an Azure Cloud Shell Bash session by using the existing Archlod49377787 resource group, the existing sa49377787 storage account, and a new file share named bash.


Pull the image from docker hub:

Tag the image for your azure container registry (ACR):
based on previous info our ACR is: acr49380771.azurecr.io

login to the azure container:(authenticate with ACR before pushing the image)
push the image to ACR:

In this challenge, you will configure a near real-time metric alert. First, you will create a Linux virtual machine. Next, you will create an action group, and then you will create a near real-time metric alert that uses the action group. Finally, you will test the alert.
Open an Azure Cloud Shell Bash session without mounting a storage account.
Create a new Linux virtual machine that generates an SSH key pair by using the az vm create command and the values in the following table:
| Property | Value | | --- | --- | | Resource group | rg1lod49443856 | | Name | VM1 | | Image | Ubuntu2204 | | Size | Standard_DS1_v2 | | Admin Username | azureuser |
az vm create -g rg1lod49443856 --generate-ssh-keys --name VM1 --image Ubuntu2204 --size Standard_DS1_v2 --admin-username azureuser

Kep record the public IP address of VM1
Create an SSH connection to the virtual machine by using azureuser@20.39.47.37
ssh azureuser@20.39.47.37
Update the Linux virtual machine by using the sudo command and the apt-get tool with the update option.


You can create an action group before or during the creation of an alert rule by using the Azure portal, the Set-AzActionGroup cmdlet , or the az monitor action-group create Azure CLI 2.0 command.
You can use action groups to configure preferences for actions that you want Azure to take when a specific monitored event occurs.
Verify that your personal email has been added to the Cloud Operations action group(Check your email)
Create an alert rule named Percentage CPU greater than 85 for VM1 that will send a notification that has a description of Alert when the average Percentage CPU is greater than 85 to the Cloud Operations alert group.


You can create a metric alert rule by using the Azure portal, the Add-AzMetricAlertRuleV2 cmdlet, or the az monitor alert create CLI 2.0 command.


You have accomplished the following:
Created a Linux virtual machine.
Created an action group.
Created a near real-time metric alert on a virtual machine.
Tested the near real-time metric alert.