Lab 06: Implement Traffic Management
A
I’m Amir Rouhanipoor, an IT Consultant specializing in Azure and cloud solutions. I help organizations streamline their IT and drive growth through secure, efficient cloud technologies.
Search for a command to run...
I’m Amir Rouhanipoor, an IT Consultant specializing in Azure and cloud solutions. I help organizations streamline their IT and drive growth through secure, efficient cloud technologies.
No comments yet. Be the first to comment.
This lab covers creating and configuring Azure Storage accounts, focusing on Azure blob and Azure files. Focusing on storage Browser to configure and secure Azure file shares, security (network restrictions, SAS), and data lifecycle management. Scena...
PowerShell Script for VM Size Comparison This script lists all session hosts with their host pool, VM name, and VM size across all host pools(loop through multiple resource groups): Connect-AzAccount # Get all host pools $hostPools = Get-AzWvdHostPo...
M03 - Unit 4: Configure an ExpressRoute Gateway Exercise Scenario To connect your Azure virtual network to your on-premises network using ExpressRoute, you must first create a virtual network gateway. A virtual network gateway serves two key purposes...
M02-Unit 3 Create and configure a virtual network gateway Scenario You will configure a VPN gateway to securely connect CoreServicesVnet (East US) and ManufacturingVnet (North Europe) using VNet-to-VNet VPN. Task 1: Create CoreServicesVnet and Manuf...
Introduction Azure ExpressRoute is a private, enterprise-grade connection that enables secure and reliable network connectivity between your on-premises infrastructure and Microsoft’s global network. It bypasses the public internet and provides high ...
You need to create three virtual networks: 1. CoreServicesVnet Region: East US Purpose: Main network (web services, databases, shared services like DC/DNS). Connectivity: Needs VPN connection to on-premises. Address Space: Large (because of expe...
Security-focused Cloud & Automation Engineer with a Master’s in Computer Science and 6+ years of experience automating and supporting enterprise IT environments across multi-site corporate and operational infrastructures. Proficient in Python scripting, Azure infrastructure, Windows Server, and identity management. Skilled in integrating third-party platforms, securing configurations, and streamlining operations. Currently pursuing the Cybersecurity Architect Expert certification with a strong focus on cloud security and automation.
Configure and test both an Azure Load Balancer (Layer 4) and an Azure Application Gateway (Layer 7) for distributing traffic to web servers.
Scenario: Your organization hosts a public website. You need to load balance incoming traffic across multiple virtual machines (VMs) for high availability. Additionally, you want to route requests for images and videos to different backend servers based on the URL path.
Key Concepts:
Azure Load Balancer: Distributes network traffic at Layer 4 (TCP/UDP). Provides high availability and scalability.
Azure Application Gateway: A web traffic load balancer (Layer 7) that can make routing decisions based on URL path, host headers, and other HTTP attributes. Offers features like Web Application Firewall (WAF).
Frontend IP Configuration: The public or private IP address that clients use to access the load-balanced service.
Backend Pool: The group of VMs or other resources that receive the traffic from the load balancer.
Health Probes: Checks the health of backend instances to ensure traffic is only sent to healthy servers.
Load Balancing Rules: Define how incoming traffic is distributed to the backend pool based on port, protocol, and other criteria.
Listener (Application Gateway): Listens for incoming traffic on a specific port and protocol.
Routing Rule (Application Gateway): Connects a listener to a backend pool and defines how traffic is routed based on URL path or other criteria.
Lab Tasks :
Task 1: Use a template to provision an infrastructure.
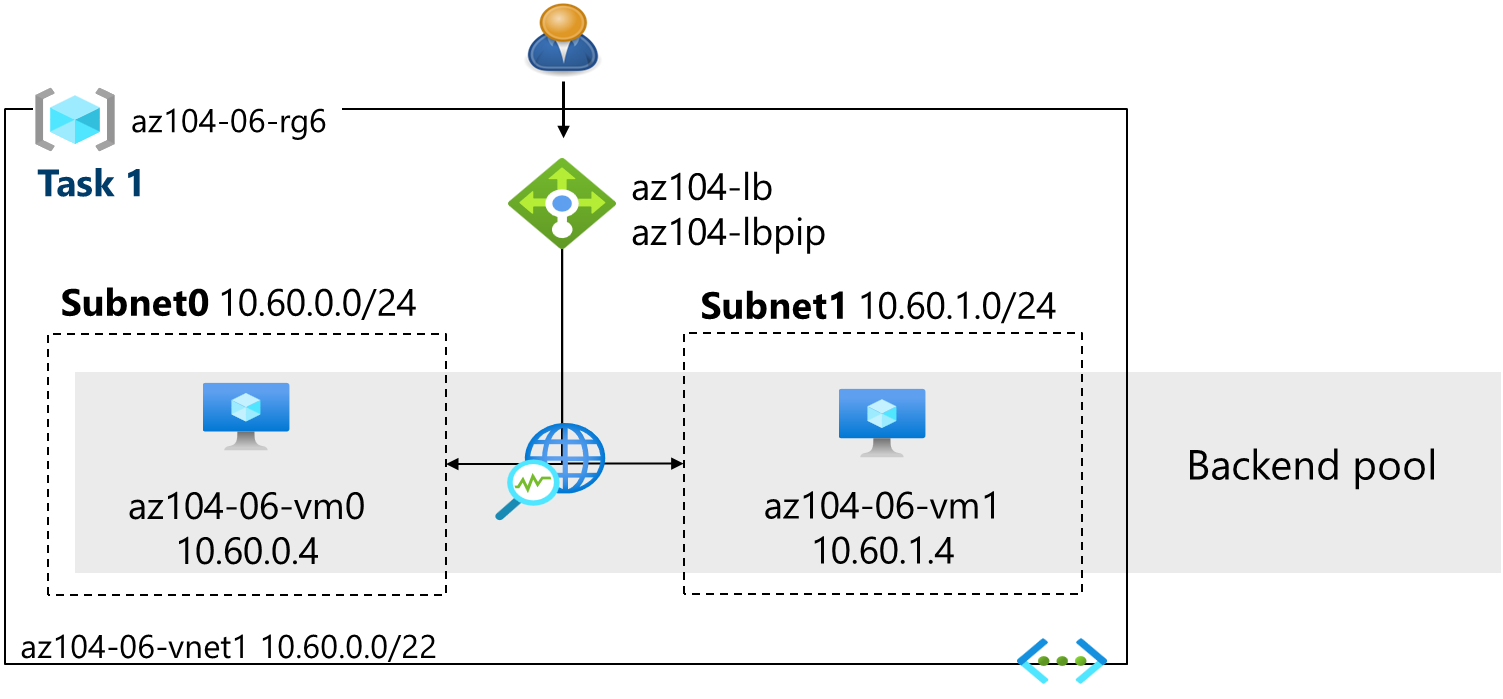
Task 2: Configure an Azure Load Balancer.
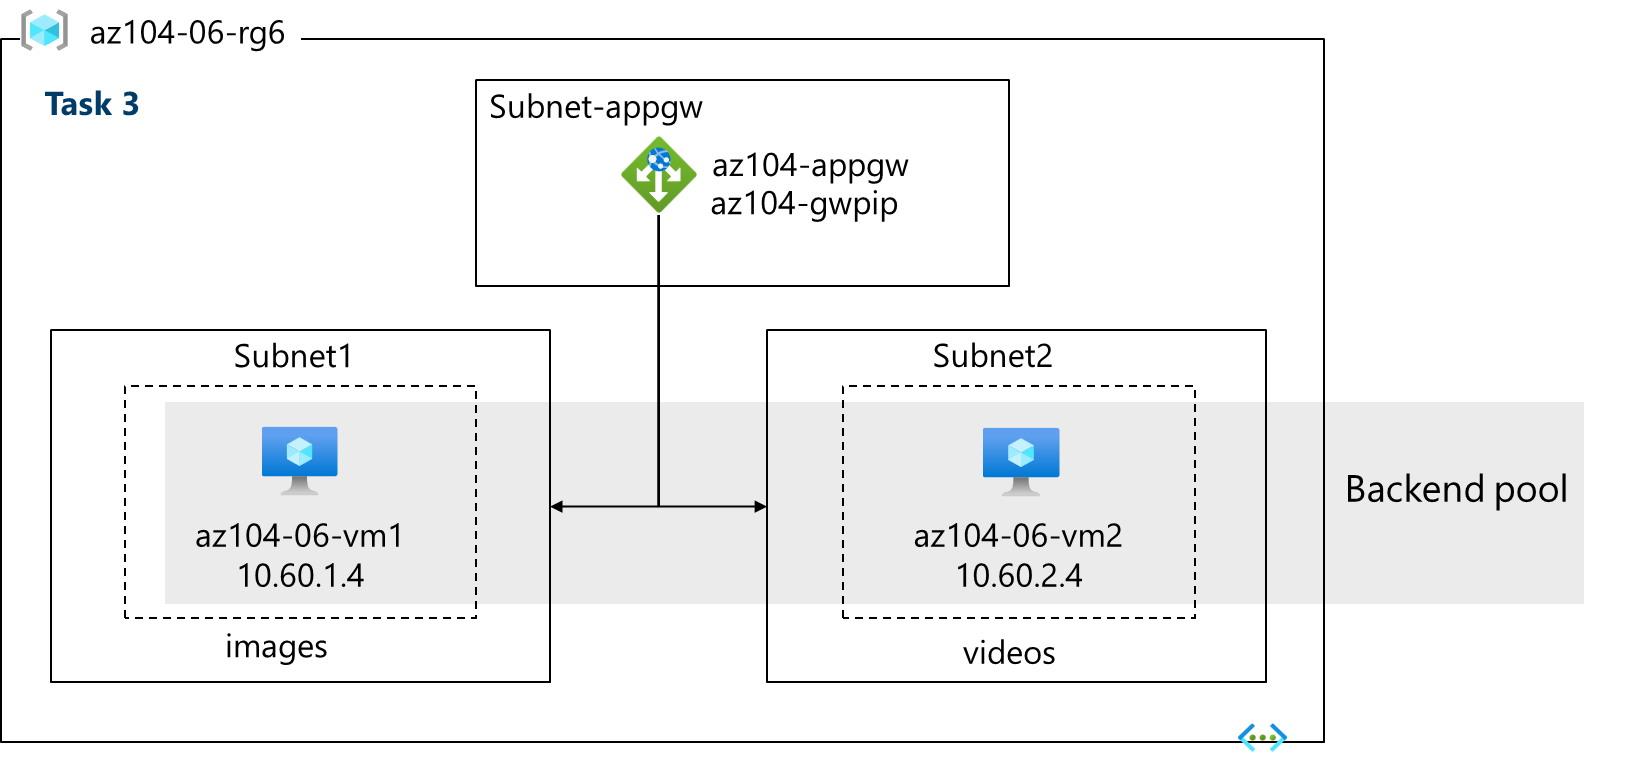
Task 3: Configure an Azure Application Gateway.
Task 1: Provision Infrastructure (Template)
Download Lab Files: Download the \Allfiles\Lab06 files (template and parameters). These should include az104-06-vms-template.json and az104-06-vms-parameters.json.
Deploy Custom Template:
Search for and select "Deploy a custom template" and choose "Build your own template in the editor."
Click "Load file" and select az104-06-vms-template.json and click "Save."
Click "Edit parameters" and load the az104-06-vms-parameters.json file and click "Save."
Basics:
Subscription: (Select your subscription)
Password: (Provide a strong password)
Task 2: Configure Azure Load Balancer

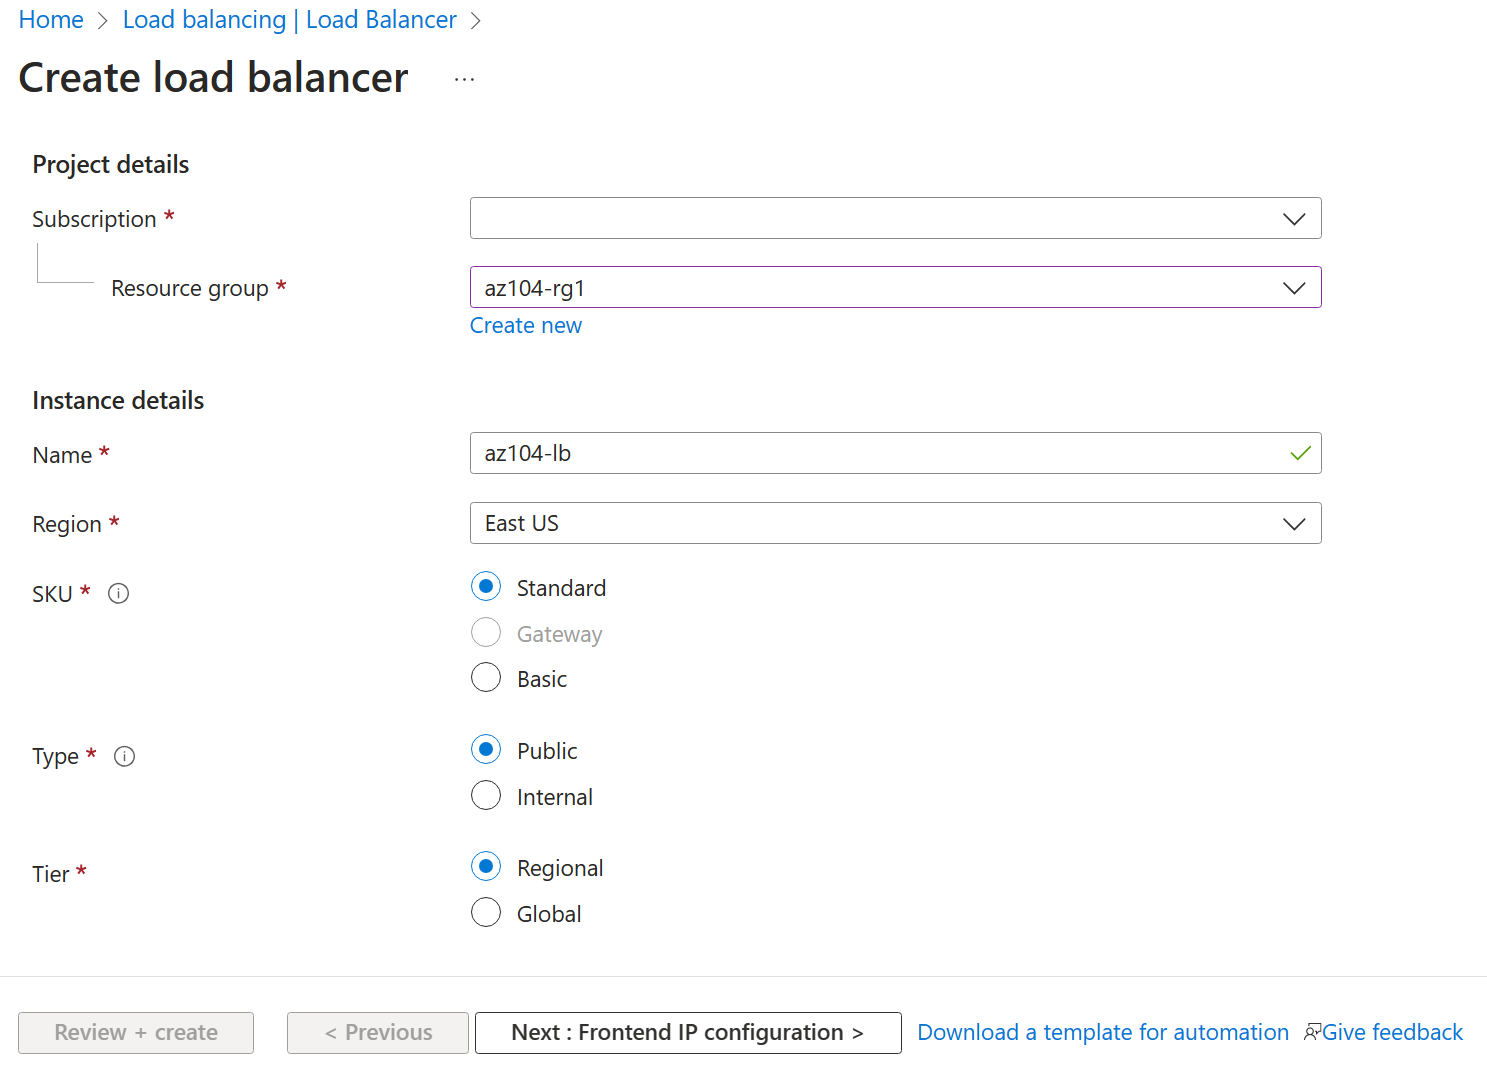
Create Load Balancer: Search for and select "Load balancers" and click "+ Create."
Basics:
Subscription: (Your subscription)
Resource Group: az104-rg6
Name: az104-lb
SKU: Standard
Type: Public
Tier: Regional
Select Next: Frontend IP configuration.
Frontend IP Configuration:
Click "Add a frontend IP configuration."
Name: az104-fe
IP type: IP address
Click Create new under the Public IP address section. Use the following and click OK.
Name: az104-lbpip
SKU: Standard
Tier: Regional
Assignment: Static
Select Next: Backend pools.

Backend Pool:
Click "Add a backend pool."
Name: az104-be
Virtual network: az104-06-vnet1
Backend Pool Configuration: NIC
Select Add.
az104-06-vm0 and az104-06-vm1 to the backend pool (check the boxes).Click "Add" (to add the VMs)
Click Add (to create the backend pool).
Select Next: Inbound Rules.

Load Balancing Rule:

Click "+ Add a load balancing rule."
Name: az104-lbrule
IP Version: IPv4
Frontend IP address: az104-fe
Backend pool: az104-be
Protocol: TCP
Port: 80
Backend port: 80
Health probe: Click "Create new."
Name: az104-hp
Protocol: TCP
Port: 80
Interval: 5
Click "OK."
Session persistence: None
Idle timeout (minutes): 4
TCP reset: Disabled
Floating IP: Disabled *Outbound source network address translation (SNAT): Recommended
Review + create: verify, and create.


Frontend IP Configuration. * Copy the Public IP address from the Frontend IP configuration. * Open a new browser tab and paste the IP address. You should see "Hello World from az104-06-vm0" or "Hello World from az104-06-vm1." * Refresh the page several times (or open a new InPrivate/Incognito window). The message should alternate between the two VMs, demonstrating load balancing.Task 3: Configure Azure Application Gateway
Add Subnet:
Find az104-06-vnet1 and under "Settings," select "Subnets."
Click "+ Subnet."
Name: subnet-appgw
Starting address: 10.60.3.224/27 (This provides enough addresses for the Application Gateway)
Click "Save."
Create Application Gateway:
Search for and select "Application gateways."
Click "+ Create."
Basics:
Subscription: (Your subscription)
Resource Group: az104-rg6
Application gateway name: az104-appgw
Tier: Standard V2
Enable autoscaling: No
Minimum instance count: 2
Availability zone: 1 (default)
HTTP2: Disabled
Virtual network: az104-06-vnet1
Subnet: subnet-appgw (10.60.3.224/27)
Click "Next: Frontends >."

Frontend Configuration:
Frontend IP address type: Public
Public IP address: Click "Add new."
Name: az104-gwpip
Click OK.
Click "Next: Backends >."

Backend Pools:
Click "Add a backend pool."
Name: az104-appgwbe
Add backend pool without targets: No
Add the virtual machines: Select the NICs of both VM's: az104-06-nic1 (10.60.1.4) and az104-06-nic2 (10.60.2.4)
Click "Add."
Add an images backend pool:
Click "Add a backend pool."
Name: az104-imagebe
Add without targets: No
Add az104-06-nic1(10.60.1.4)
Click "Add".
Add a videos backend pool:
Click "Add a backend pool."
Name: az104-videobe
Add without targets: No
Add az104-06-nic2(10.60.2.4)
Click "Add".


Click "Next: Configuration >."
Click Add a routing rule
Click "Add a routing rule."
Rule name: az104-gwrule
Priority: 100
Listener name: az104-listener
Frontend IP: Public IPv4
Protocol: HTTP
Port: 80
Listener type: Basic


Backend Target: az104-appgwbe
Backend settings: Click "Add new."
Backend Setting Name: az104-http
Click "Add."

Add rule for images.
Path: /image/*
Target name: images
Backend settings: az104-http
Backend Target: az104-imagebe
Select Add.
Add rule for videos.
Path: /video/*
Target name: videos
Backend settings: az104-http
Backend Target: az104-videobe
Select Add.
Click Save


Clik "Next: Tags >" (no changes needed).
Click "Next: Review + create >," then click "Create."
Wait for Deployment: This will take 5-10 minutes.
Once deployed, go to the az104-appgw resource.
Check Backend Health (under "Monitoring"): Ensure both servers in the backend pool show Healthy.

On the "Overview" blade, copy the Frontend public IP address.
Test Image Routing: Open a new browser tab and go to http://<frontend ip address>/image/. You should be directed to the image server (vm1).
Test Video Routing: Open a new browser tab and go to http://<frontend ip address>/video/. You should be directed to the video server (vm2).
You may need to use InPrivate/Incognito windows or clear your cache to ensure you're seeing the correct routing.
Here is the task 3 in summary:
Create Subnet:
In the Azure portal, add a subnet (subnet-appgw) to az104-06-vnet1 for the Application Gateway.
Ensure the subnet size is /27 or larger.
Deploy Application Gateway:
Use the Azure portal to create an Application Gateway (az104-appgw) with the following settings:
Resource Group: az104-rg6
Region: Same as Task 1
Tier: Standard V2
Virtual Network: az104-06-vnet1
Subnet: subnet-appgw
Frontend IP: Create a public IP address (az104-gwpip).
Configure Backend Pools:
Create backend pools to route traffic:
az104-appgwbe: General pool with both VMs (az104-06-nic1 and az104-06-nic2).
az104-imagebe: Routes images to VM (az104-06-nic1).
az104-videobe: Routes videos to VM (az104-06-nic2).
Add Routing Rules:
Add routing rules for path-based traffic:
Rule for Images: Routes traffic with /image/* path to az104-imagebe.
Rule for Videos: Routes traffic with /video/* path to az104-videobe.