Lab 10: Implement Data Protection
A
I’m Amir Rouhanipoor, an IT Consultant specializing in Azure and cloud solutions. I help organizations streamline their IT and drive growth through secure, efficient cloud technologies.
Search for a command to run...
I’m Amir Rouhanipoor, an IT Consultant specializing in Azure and cloud solutions. I help organizations streamline their IT and drive growth through secure, efficient cloud technologies.
No comments yet. Be the first to comment.
Introduction This lab provides hands-on experience with Azure Monitor, a powerful platform for collecting, analyzing, and acting on telemetry from your Azure and on-premises environments. You'll learn to create alerts, configure notifications, and ex...
PowerShell Script for VM Size Comparison This script lists all session hosts with their host pool, VM name, and VM size across all host pools(loop through multiple resource groups): Connect-AzAccount # Get all host pools $hostPools = Get-AzWvdHostPo...
M03 - Unit 4: Configure an ExpressRoute Gateway Exercise Scenario To connect your Azure virtual network to your on-premises network using ExpressRoute, you must first create a virtual network gateway. A virtual network gateway serves two key purposes...
M02-Unit 3 Create and configure a virtual network gateway Scenario You will configure a VPN gateway to securely connect CoreServicesVnet (East US) and ManufacturingVnet (North Europe) using VNet-to-VNet VPN. Task 1: Create CoreServicesVnet and Manuf...
Introduction Azure ExpressRoute is a private, enterprise-grade connection that enables secure and reliable network connectivity between your on-premises infrastructure and Microsoft’s global network. It bypasses the public internet and provides high ...
You need to create three virtual networks: 1. CoreServicesVnet Region: East US Purpose: Main network (web services, databases, shared services like DC/DNS). Connectivity: Needs VPN connection to on-premises. Address Space: Large (because of expe...
Security-focused Cloud & Automation Engineer with a Master’s in Computer Science and 6+ years of experience automating and supporting enterprise IT environments across multi-site corporate and operational infrastructures. Proficient in Python scripting, Azure infrastructure, Windows Server, and identity management. Skilled in integrating third-party platforms, securing configurations, and streamlining operations. Currently pursuing the Cybersecurity Architect Expert certification with a strong focus on cloud security and automation.
Objective: This lab introduces Azure Backup and Azure Site Recovery for protecting Azure virtual machines. You'll create a Recovery Services vault, configure VM backups, monitor backup jobs, and enable VM replication for disaster recovery.
Scenario: Your organization is evaluating Azure's data protection capabilities. You need to implement a backup solution for Azure VMs and explore Azure Site Recovery for disaster recovery preparedness.
Key Concepts:
Recovery Services Vault: A storage entity in Azure that houses backup data and recovery points for protected resources (VMs, databases, etc.). It's the central management point for Azure Backup and Azure Site Recovery.
Backup Policy: Defines the schedule for backups (frequency) and how long recovery points are retained (retention period).
Azure Backup: A service for backing up data to a Recovery Services vault. It supports various workloads,including Azure VMs, on-premises servers, and Azure Files.
Azure Site Recovery (ASR): A disaster recovery service that replicates workloads from a primary site to a secondary location. In case of an outage at the primary site, you can failover to the secondary site.
Replication: The process of continuously copying data from a source (e.g., a VM) to a target (e.g., a Recovery Services vault in a different region).
Failover: The process of switching from the primary site to the secondary site (replica) in the event of an outage.
Failback: The process of switching back to the primary site after the outage is resolved.
Soft Delete: Helps protect backup data from accidental deletion.
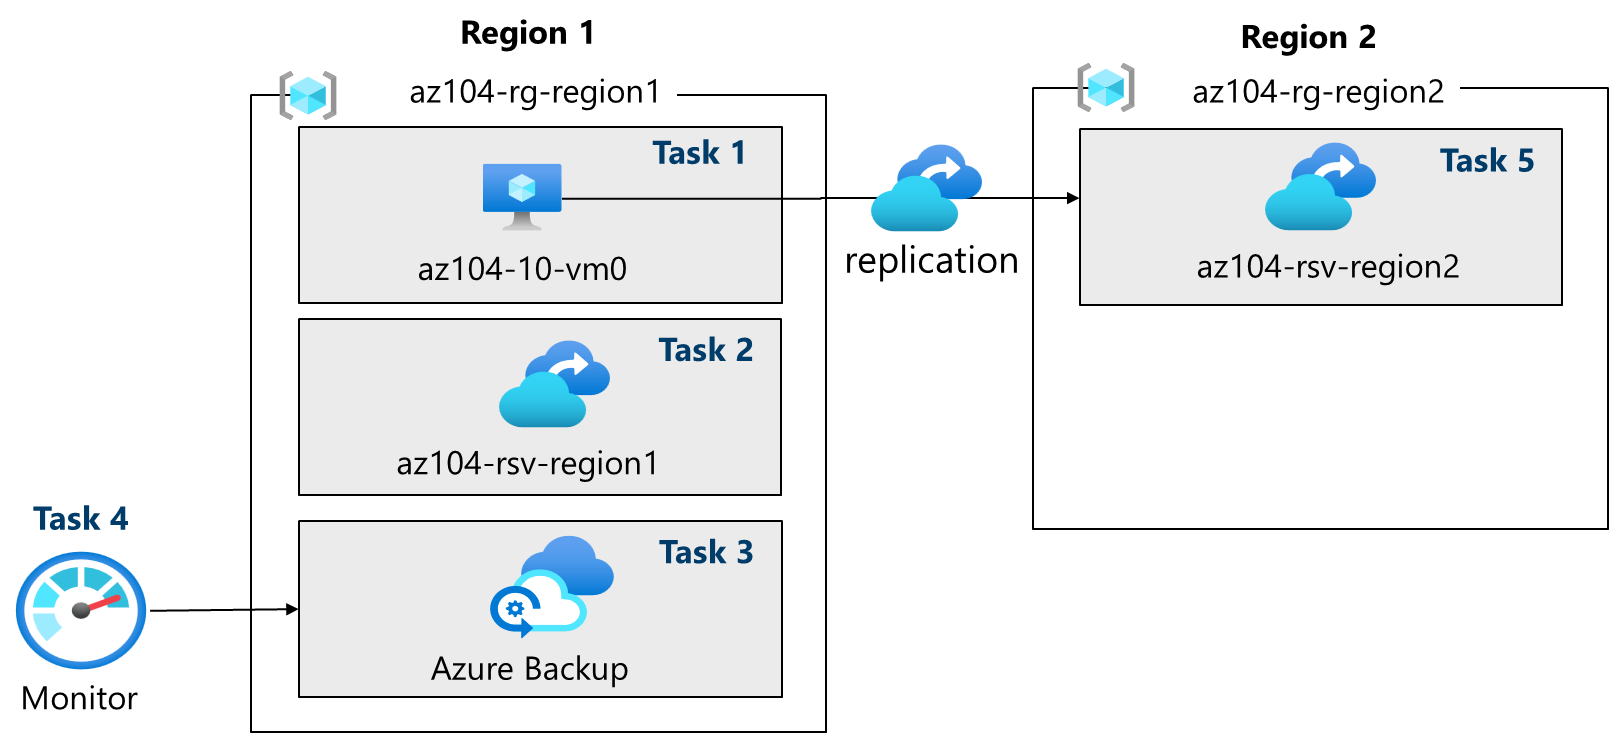
Task 1: Use a template to provision an infrastructure.
Task 2: Create and configure a Recovery Services vault.
Task 3: Configure Azure virtual machine-level backup.
Task 4: Monitor Azure Backup.
Task 5: Enable virtual machine replication.
Download Lab Files: Download the \Allfiles\Labs\Lab10 files (template and parameters: az104-10-vms-edge-template.json and az104-10-vms-edge-parameters.json).
Sign In: Log in to the Azure portal (https://portal.azure.com).
Deploy Custom Template:
Search for and select "Deploy a custom template."
Choose "Build your own template in the editor."
Click "Load file" and select az104-10-vms-edge-template.json.
Click "Save."
Click "Edit parameters" and load the az104-10-vms-edge-parameters.json file.
Click Save.
Basics:
Username: localadmin
Password: (Provide a strong password)
Click "Review + create," then "Create."
Go to Resource: Once deployed, click "Go to resource." (This will take you to the deployed VM, az104-10-vm0). You should have one VM in one VNet.
Create Vault: Search for and select "Recovery Services vaults" and click "+ Create."
Basics:
Vault Name: az104-rsv-region1
Region: East US (Must be the same region as the VM)
Click "Review + create," then "Create."
Go to Resource: Once deployed, click "Go to resource."
Configure Storage Redundancy (Before Backups):
In the vault, under "Settings," select "Properties."
Under "Backup Configuration," click "Update."
Storage replication type: Leave as Geo-redundant (default). Note: This can only be configured before any backups are created. Close the blade.
The Cross Region Restore option allows you to restore data in a secondary, Azure paired region.
Review Security Settings (Soft Delete):
Under "Security Settings," click "Update".
Note that "Soft Delete (For workload running in Azure)" is Enabled by default with a 14-day retention.This helps protect against accidental or malicious deletion of backups.


Initiate Backup:
In your Recovery Services vault (az104-rsv-region1), click "Overview," then "+ Backup."
Backup Goal:
Where is your workload running?: Azure
What do you want to backup?: Virtual machine
Click "Backup."

Create Backup Policy:
Policy sub type: Standard
In "Backup policy", select "Create a new policy."
Policy name: az104-backup
Frequency: Daily
Time: 12:00 AM
Timezone: (Select your local time zone)
Retain instant recovery snapshot(s) for: 2 Days(s)
Click "OK."

Add VM to Backup:
In the "Virtual Machines" section, click "Add."
Select az104-10-vm0.
Click "OK."
Click "Enable backup." (Wait for backup to be enabled - about 2 minutes.)


Trigger an Initial Backup (On-Demand):
In the Recovery Services vault, under "Protected items", click "Backup items."
Click the "Azure Virtual Machine" entry.
Select "View details" for az104-10-vm0. Note the "Backup Pre-Check" and "Last Backup Status."
Click "Backup now."
Accept the default "Retain Backup Till" date.
Click "OK." (Do NOT wait for the backup to complete; proceed to the next task.)


Create a Storage Account: Search for and select "Storage accounts" and click "Create."
Basics:
Configure Diagnostic Settings:
Go back to your Recovery Services vault (az104-rsv-region1).
Under "Monitoring," select "Diagnostic settings."
Click "Add diagnostic setting."
Diagnostic setting name: LogsAndMetricsToStorage
Logs Categories: Check:
AzureBackupReportData
AddonAzureBackupJobData
AddonAzureBackupAlertData
AzureSiteRecoveryJobs
AzureSiteRecoveryEvents
Health
Destination details: Check "Archive to a storage account."
Storage account: Select the storage account you just created.
Click "Save."
View Backup Jobs:
In your Recovery Services vault, under "Monitoring," select "Backup jobs."
Locate the backup job for az104-10-vm0.
Review the job details (status, start time, etc.).


Create a Second Recovery Services Vault (in a Different Region): Search for and select "Recovery Services vaults" and click "+ Create."
Basics:
Resource Group: az104-rg-region2 (create if it doesn't exist)
Vault Name: az104-rsv-region2
Region: Central US (Must be a different region than your VM)
Click "Review + create," then "Create."


** I had to click on create automation account here to be able to activate the “Review + Start replication”

Enable Replication on the VM:
Search for and select the az104-10-vm0 virtual machine.
Under Backup + Disaster recovery, select Disaster recovery.
Select Review + Start replication.
Basics tab: Note the Target region.
Advanced Settings Tab: Review the automatically-selected resources. Crucially, ensure the “churn for the vmand ” and "Cache storage account" have values. If not, refresh the page, or create a storage account manually and return.
Click "Review + Start replication," then "Start replication."
Wait for Replication: This will take 10-15 minutes. Monitor the notification messages in the portal.
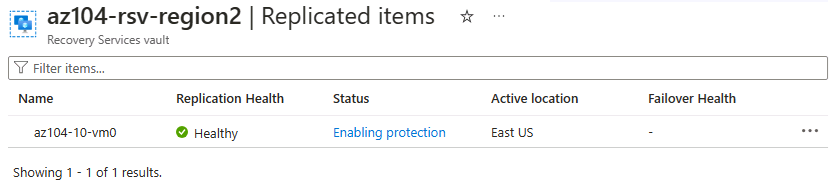
Check Replicated Items:
Once replication is complete (you'll see a notification), go to your second Recovery Services vault (az104-rsv-region2).
Under "Protected items," select "Replicated items."
You should see az104-10-vm0 listed with a "Healthy" replication status. The initial synchronization might still be in progress (showing a percentage). Eventually, it will show "Protected."
Click on the VM to view more details.

…

…